Printable Enclosure tutorial · Part 1 of 7
Build and publish your first manual
Follow along from a downloadable STEP file to a published five-step manual: upload the CAD, build 3D steps, preview, and publish.
Tutorial part 1 of 7 in the Printable Enclosure series. Get familiar with Daedum by following this 7 part tutorial. Each new tutorial part uses the Printable Enclosure to build upon from the previous tutorial part.
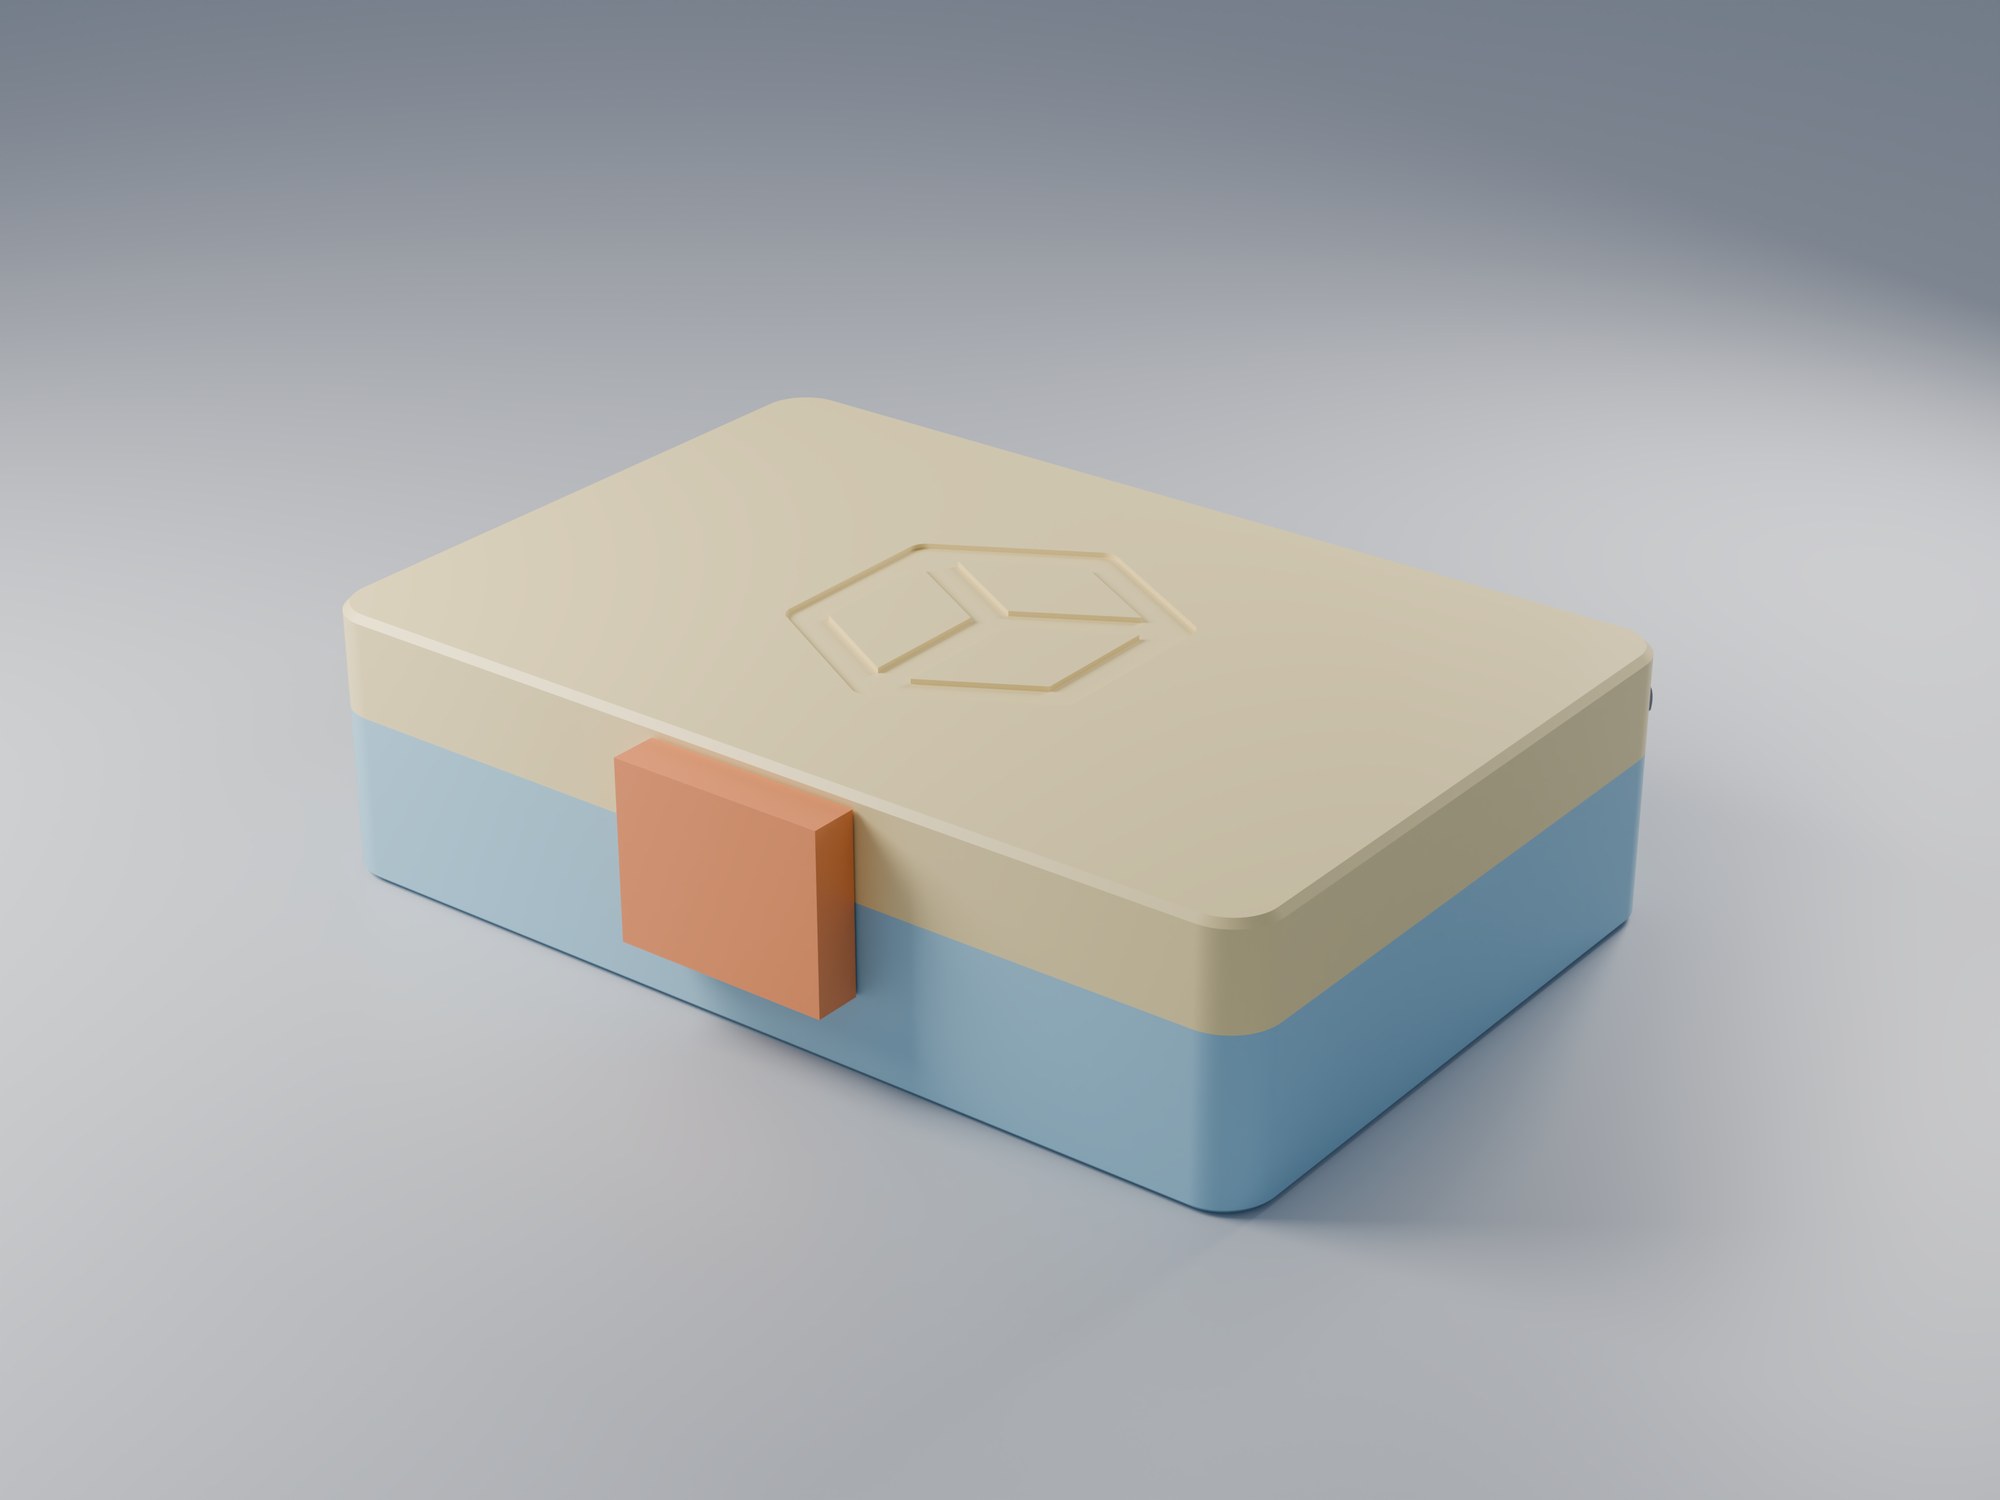
The Printable Enclosure: the 3D-printable box you will turn into a published manual.
- Target audience: new Daedum authors.
- Before you begin: download the Printable Enclosure STEP file (located below) and sign in to Daedum using the Sign in button at the top right of this page (it also lets you create an account if you don't have one yet).
- Starting point: you are signed in at the dashboard.
- End result: one previewed and published Printable Enclosure manual with five-steps.
Bonus: It is highly recommended to check out the shortcut options available. By default we use a Daedum profile, however, if you are familiar with other popular CAD software you will find some inspired profiles to set as your default. Or the option to use a full custom profile! Controls, shortcuts, and snapping explains what each preset changes.
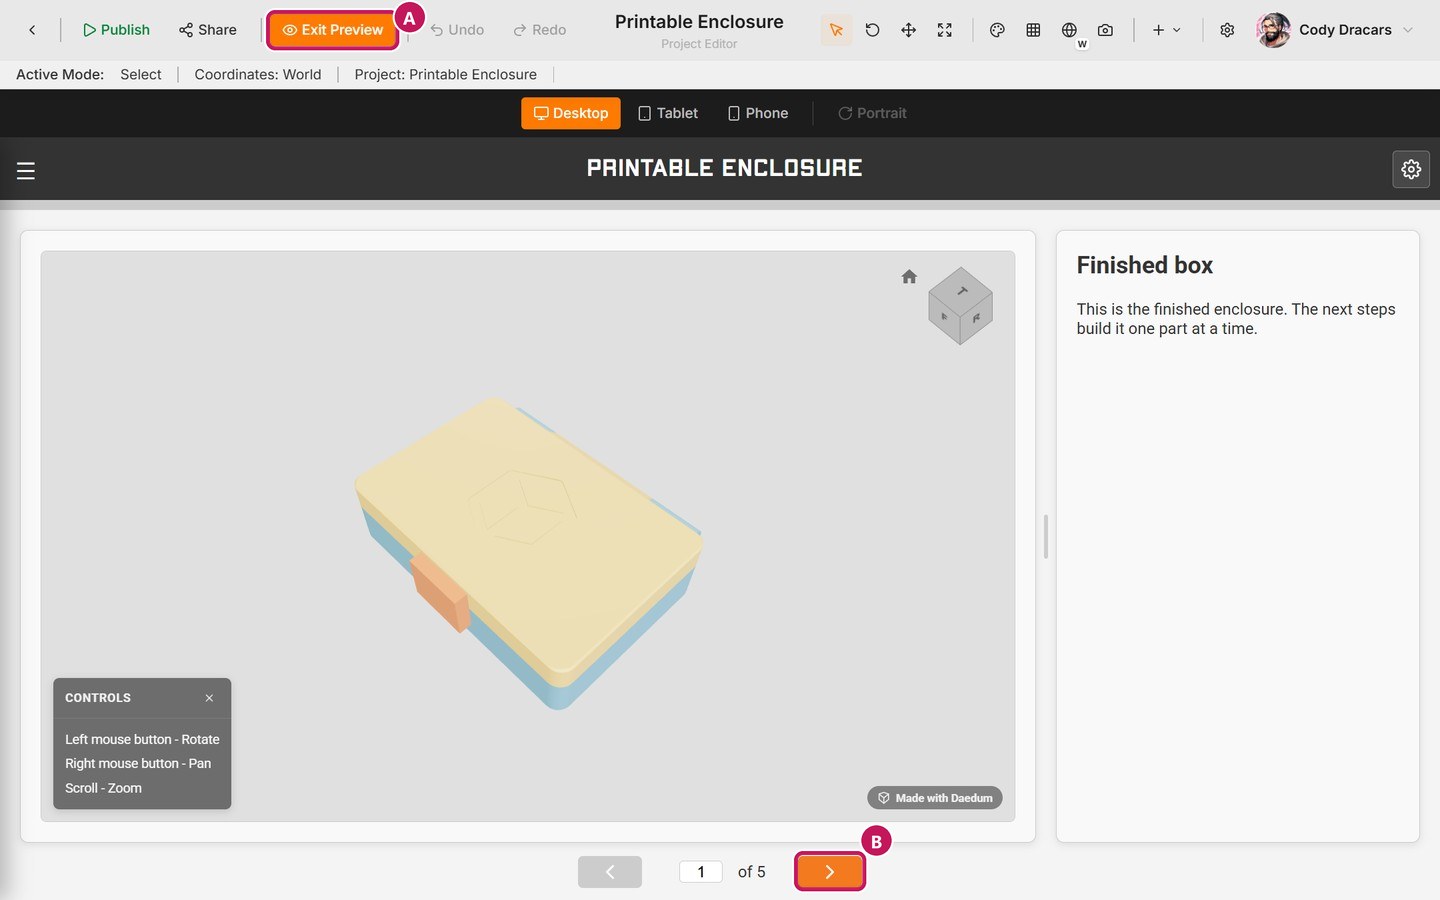
This is what you will have at the end: a five-step manual end users can follow in the browser.
A guided first manual
This is a follow-along tutorial, and it is deliberately basic. You will upload the CAD source, create a manual with five steps that each show one more part, preview the end-user experience, publish the manual, and open the live result. Use the exact file, names, and instructions on this page so your editor matches the walkthrough.
The manual you finish here is a starting point, not a showcase. The later tutorials parts return to it and improve upon it.
Download the tutorial file
A STEP file (.step or .stp) is a standard CAD export format that stores an assembly's 3D geometry — it's what Daedum converts into the interactive model behind your manual. Download `daedum-printable-enclosure.step` and save it somewhere easy to find. It is a small hinged box with four named bodies:
BaseTray— the tray, with two hinge knuckles on its back wall.Lid— the lid, with one hinge knuckle that sits between the tray's two.HingePin— the pin that joins the three knuckles.FrontLatch— a clip that slides over the front to hold the lid shut.
The enclosure is a real design: every part can be 3D printed and assembled exactly as the manual describes. The file opens as a closed box. In the tutorial, you will hide and show its bodies to make the assembly sequence clear. If the browser displays the file instead of downloading it, Right-click and Save link as….
Keep this page open while you work. The goal is to build one manual from start to finish, not to learn every Daedum feature yet.
1. Create a manual
From the dashboard, select New manual, enter a name, give a small description and select Create. For this walkthrough, use:
- Name:
Printable Enclosure - Description:
A small hinged box you can print and assemble.
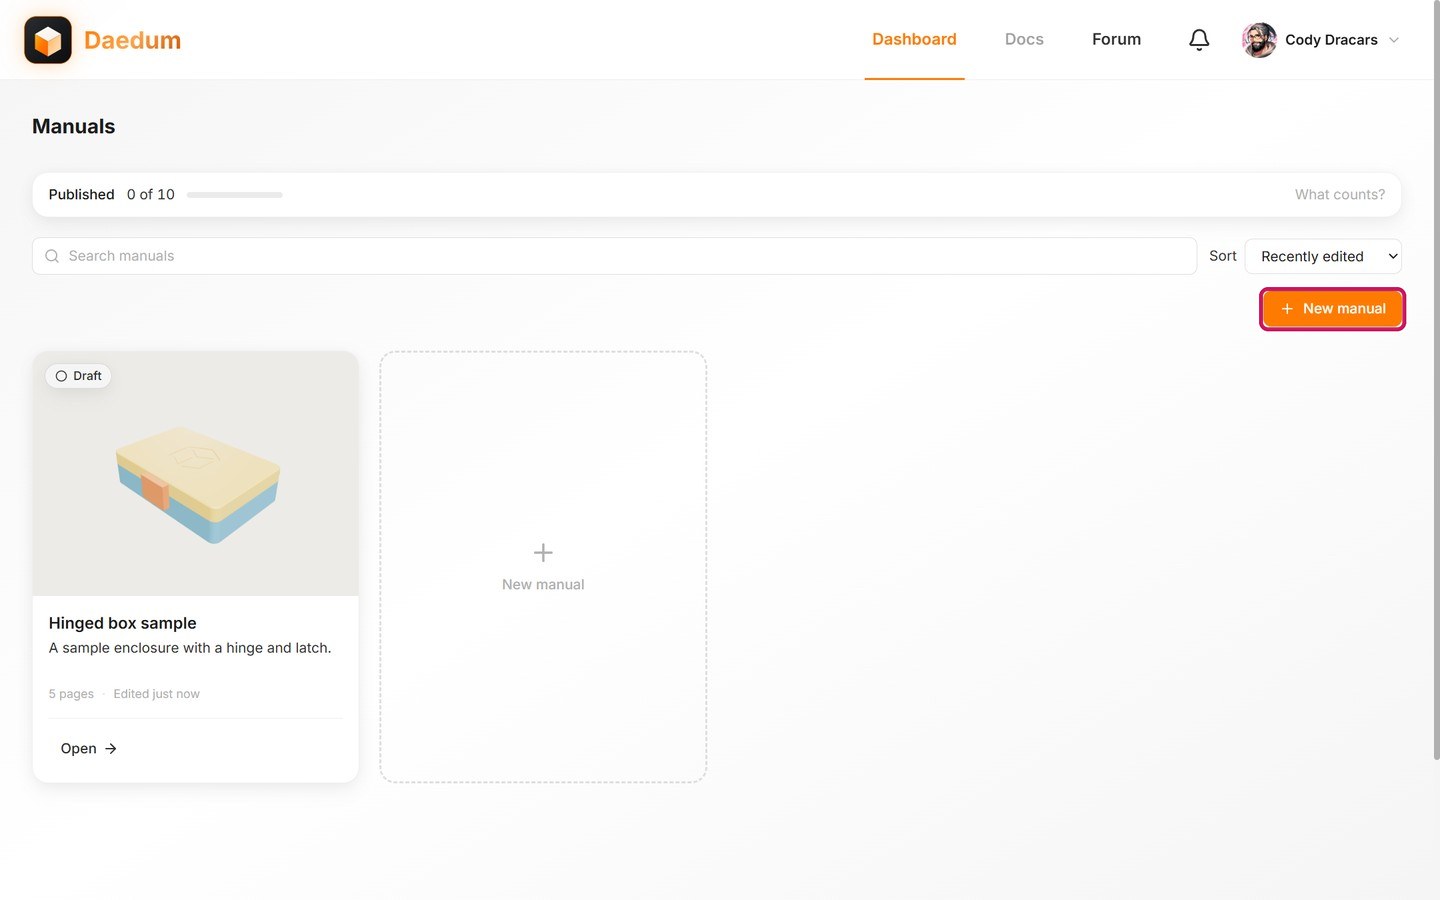
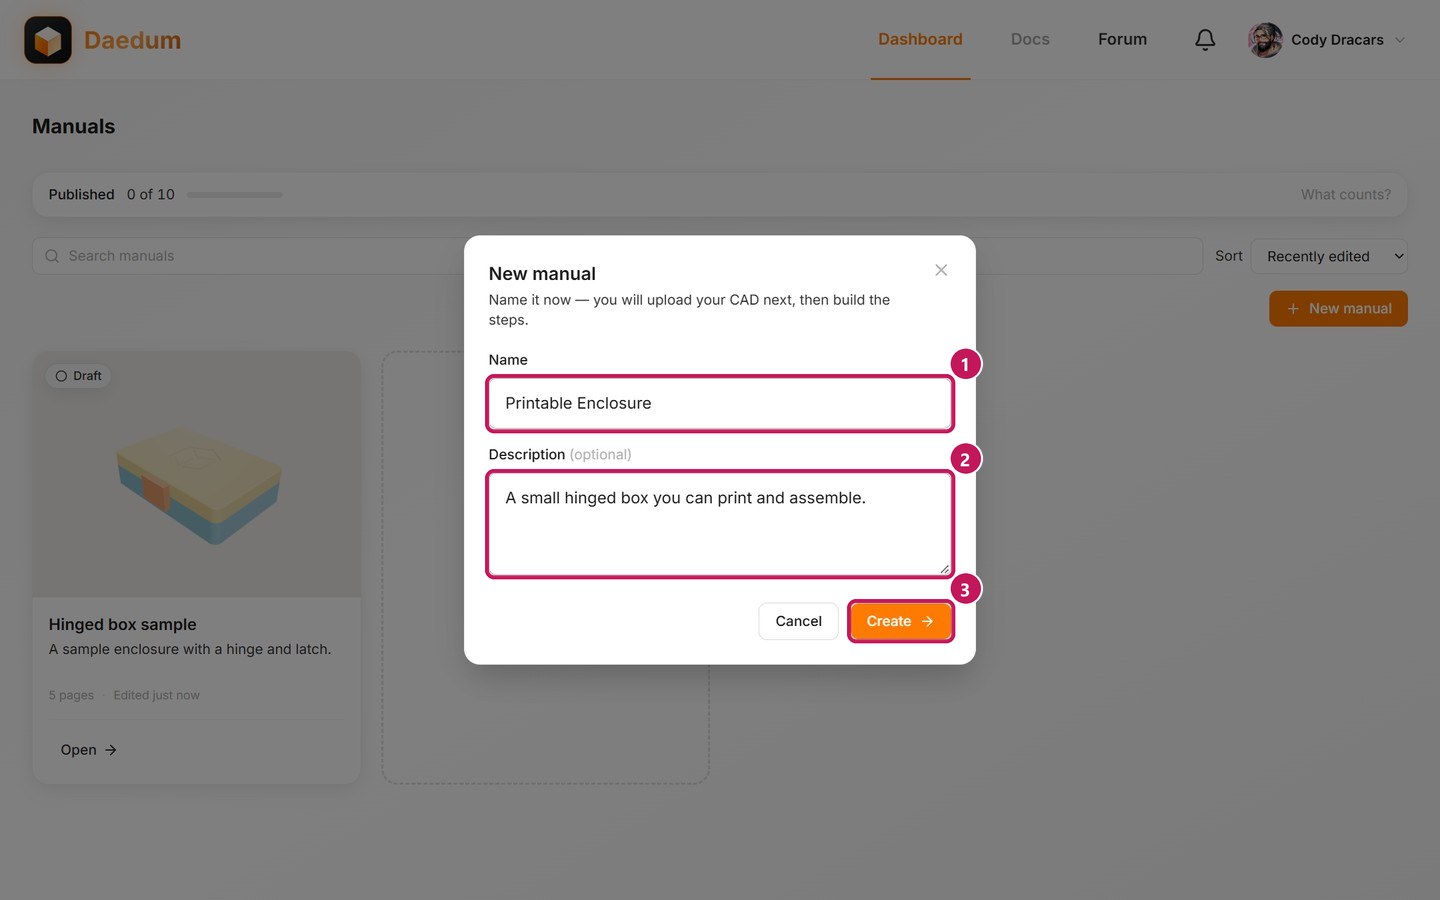
- (1) Fill in the Name
- (2) Don't forget to add the description
- (3) Select Create
Daedum creates the Project and Manual together, then opens the manual page where you can add the CAD source.
Upload the file under its original name, daedum-printable-enclosure.step, rather than renaming it. For the concepts behind Projects, manuals, and CAD conversion, see Create a manual and upload CAD after you finish the first run.
2. Upload the CAD source
On the new manual’s page, select Choose a file or drag in a .step or .stp file. There is a small wait period while Daedum converts the file to be used within the Project Editor. Don't worry, the wait should only be a few moments.
Once the conversion has been completed, you will see a green checkmark next to the filename and a preview of the file. You are now ready to click Open editor.
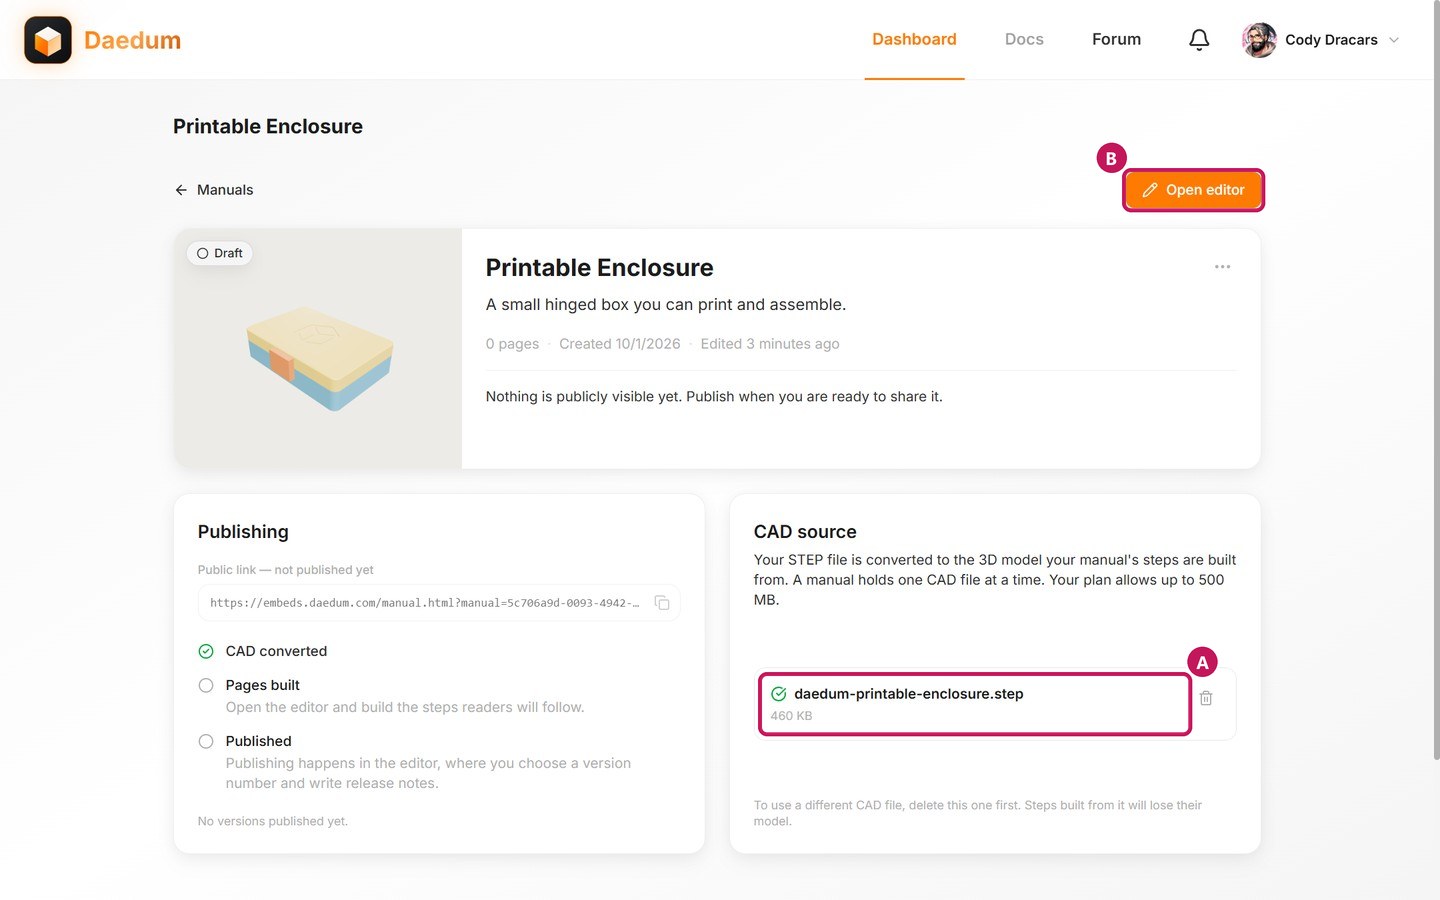
- (A) is the converted STEP file, with a green check beside it.
- (B) is Open editor.
The Publishing panel on the left tracks your progress: CAD converted is now checked, with Pages built and Published still to come.
The converted assembly becomes the 3D source for every step in this manual. If conversion does not finish, see Troubleshooting.
3. Build a five-step procedure
Select Open editor. Daedum creates Step 1 automatically. For this first manual, make five 3D steps. The first shows the finished box; each one after it adds a single part:
- Finished box — every part, so the end user sees the result first.
- Tray — only
BaseTray. - Lid — add
Lid. - Hinge pin — add
HingePin. - Latch — add
FrontLatch.
Every step after the first is made the same way: duplicate the step before it, show one more part, and rewrite the instruction. In the CAD Hierarchy panel, an open eye beside a part means it is shown in the current step.
Step 1: Show the finished box
- Keep all parts visible.
- Drag in the 3D view to rotate the box to a three-quarter view from above, so the lid and its logo face you.
- Select Set Initial Camera (
Ctrl+Alt+C) in the toolbar (toolbar is located at the top and to the right of the Manual name). - Save Camera. the end user opens the step from this angle, and every step you duplicate from it keeps the same angle.
- Give the step the title Finished box.
- In Instructions, write: “This is the finished enclosure. The next steps build it one part at a time.”
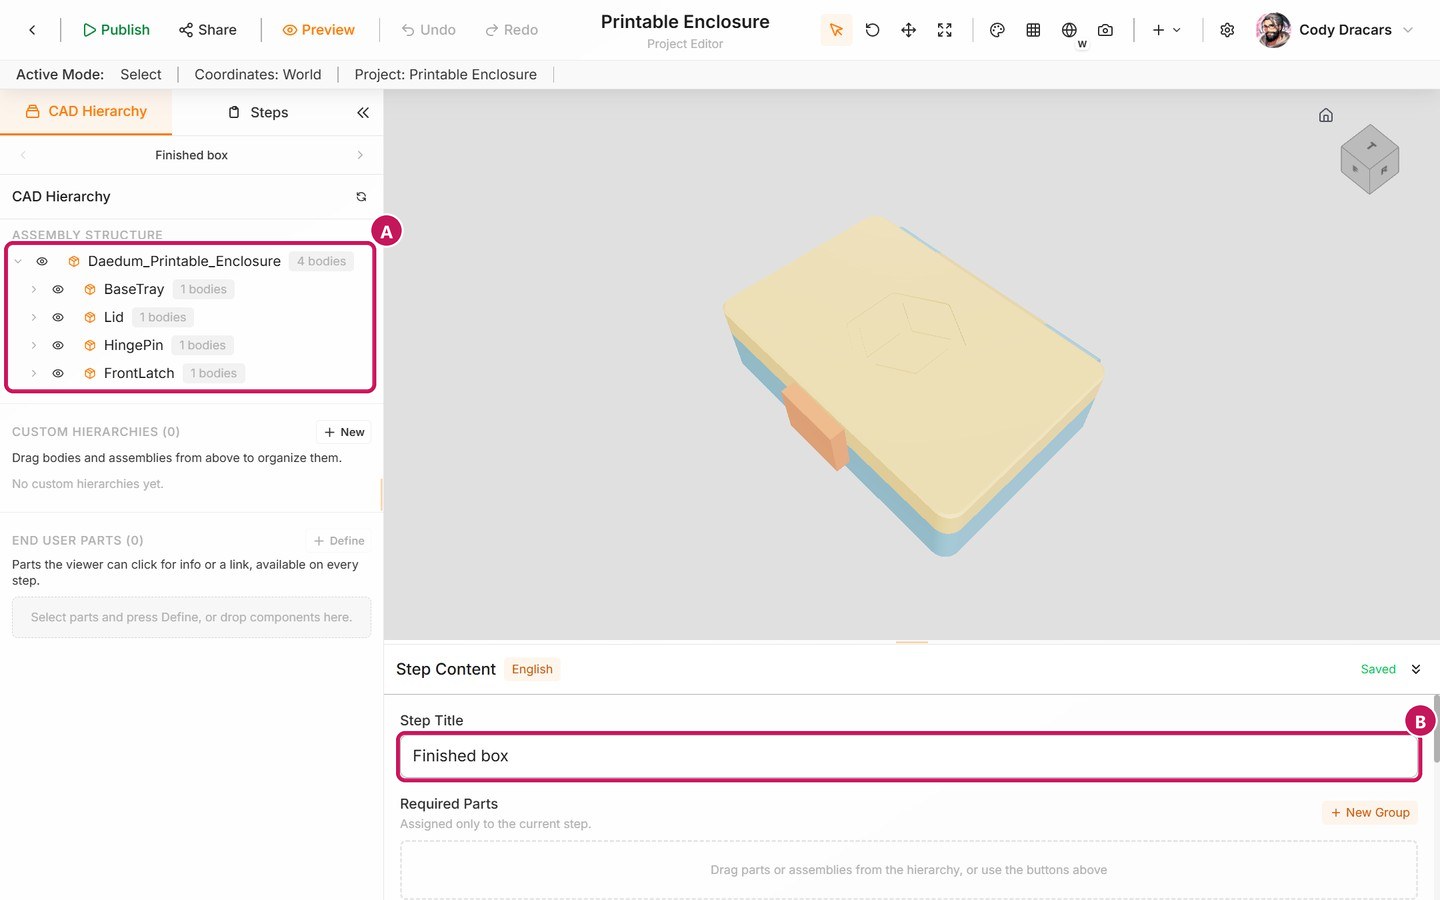
- (A) marks the parts list, where an open eye means the part is shown in this step; here every part is.
- (B) marks the step title.
Step 2: Show the tray
- Open the Steps panel and select Duplicate selected step. Name the copy Tray and select Duplicate By either clicking the two squares, or right-clicking.
- On the left hand side in CAD Hierarchy, use the assembly Show/hide all control to hide every part, then use Show for
BaseTray. - In the bottom window under Instructions, replace the text with: “Set the tray on a flat surface with its open side up.”
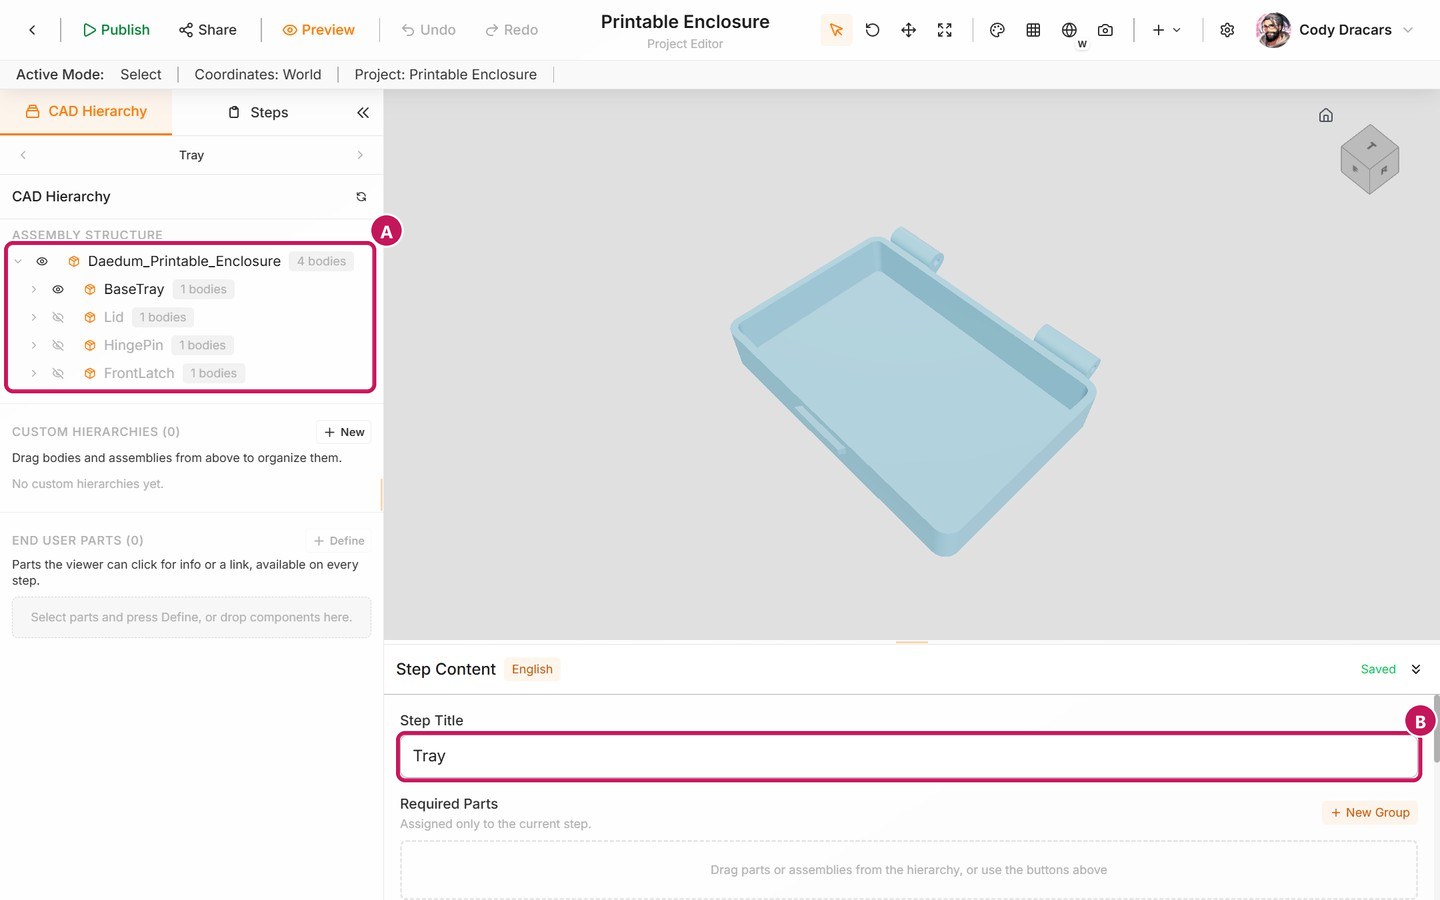
In the parts list:
- (A), only
BaseTraystill has an open eye. - The step title (B) reads Tray.
Step 3: Add the lid
- With Tray selected, duplicate it as Lid.
- Use Show for
Lid. - Replace the instruction with: “Place the lid on the tray so its hinge knuckle sits between the two knuckles on the tray.”
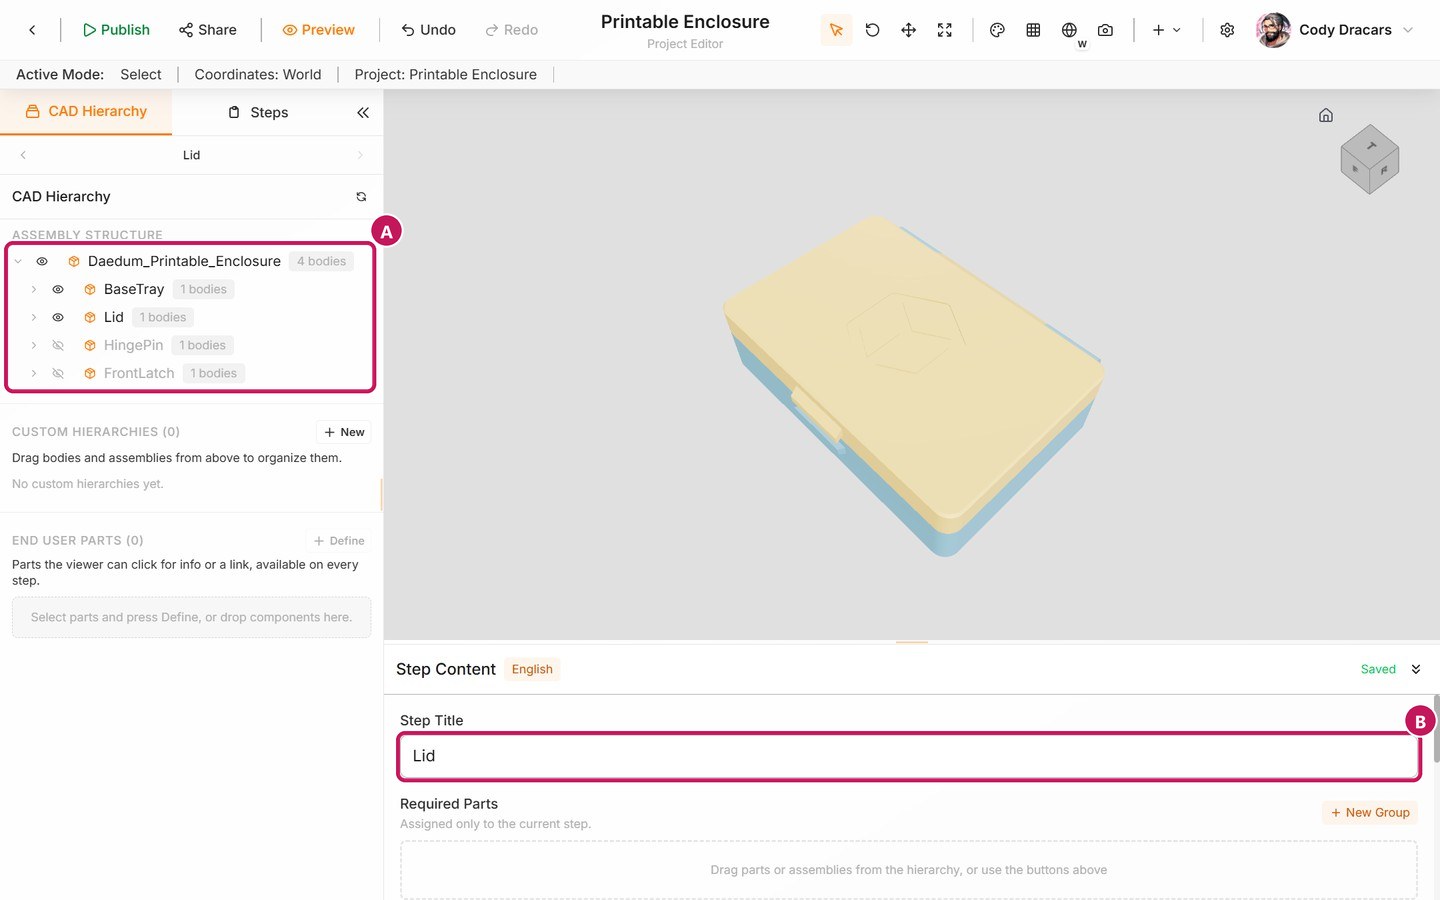
In the parts list:
- (A),
BaseTrayandLidhave open eyes. - The step title (B) reads Lid.
Step 4: Add the hinge pin
- Duplicate Lid as Hinge pin.
- Use Show for
HingePin. - Replace the instruction with: “Push the hinge pin through all three knuckles until its head rests against the tray.”
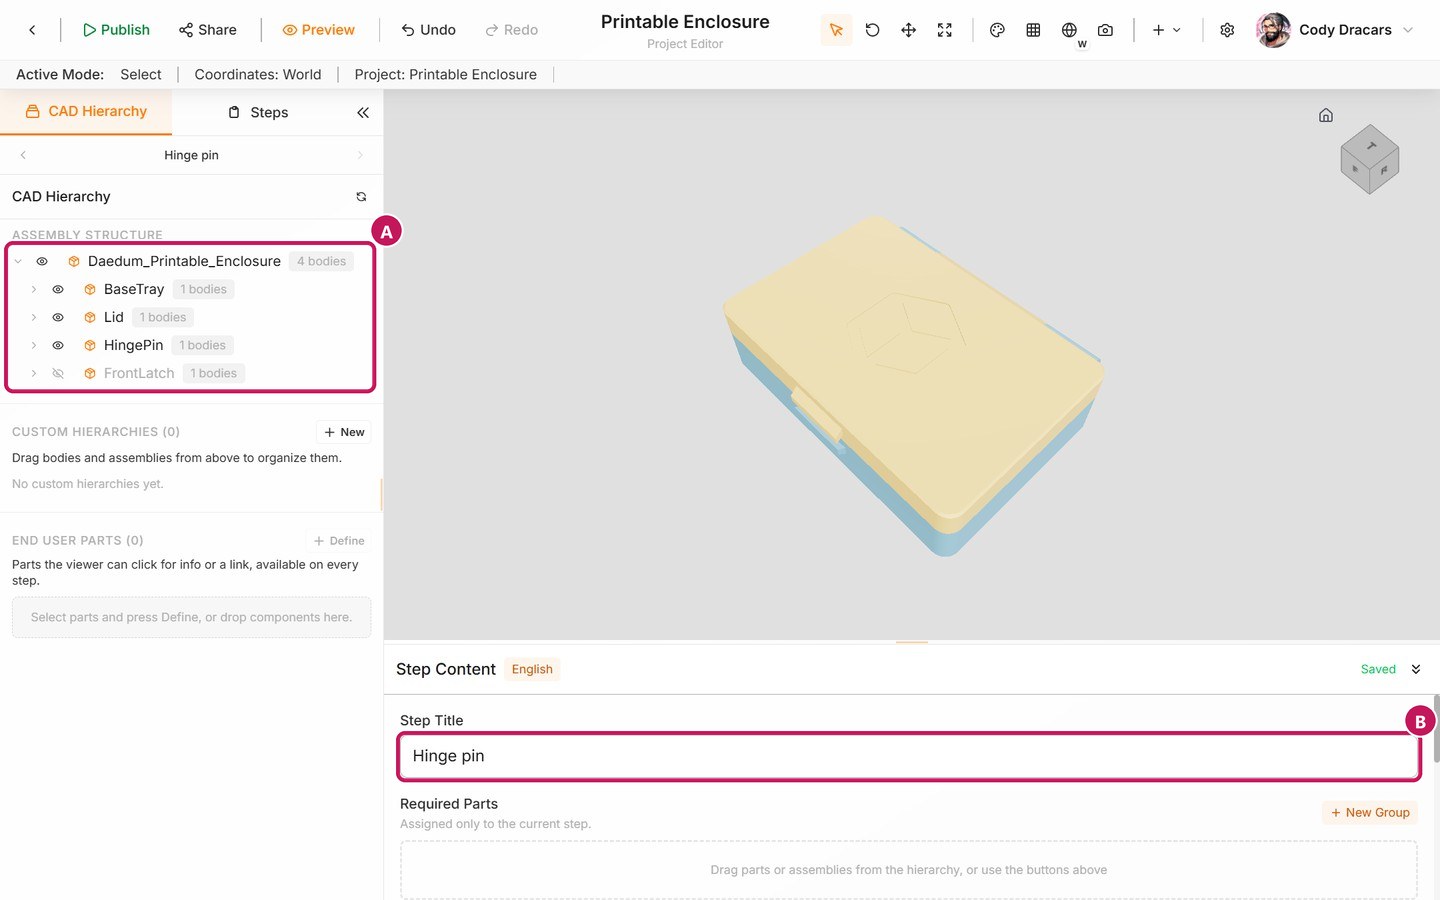
In the parts list:
- (A), every part except
FrontLatchhas an open eye. The step title. - (B) reads Hinge pin.
The pin sits behind the lid at this angle, so the manual won't directly show the correct part orientation yet. However, that will be covered in part 2 of this tutorial.
Step 5: Add the latch
- Duplicate Hinge pin as Latch.
- Use Show for
FrontLatch. - Replace the instruction with: “Close the lid, then slide the latch sideways over the rail on the front.”
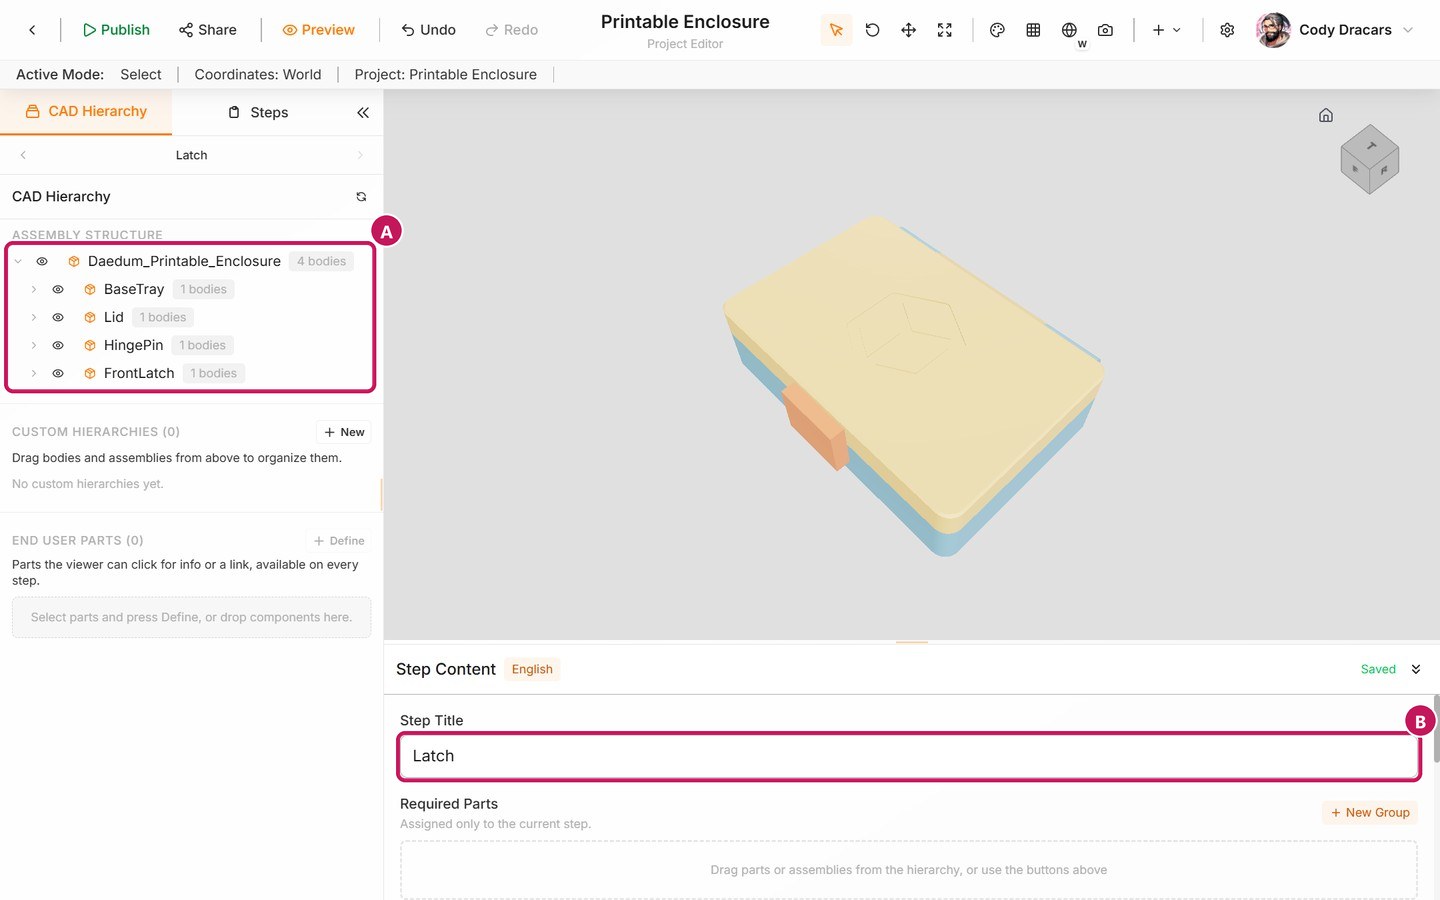
In the parts list:
- (A), every part has an open eye again.
- The step title (B) reads Latch.
- Wait for Saved before you move on.
4. Preview the end-user experience
- Select Preview in the editor toolbar (top left, or press
Ctrl+Alt+P). This opens the manual as an end user will experience it before the manual is live. - Use Desktop, Tablet, and Phone above the preview to check other screen sizes.
Use Next Step (B) to walk through the procedure. Check that:
- Step 1 shows the finished box.
- Step 2 shows only the tray.
- Steps 3, 4, and 5 each add one part: the lid, the hinge pin, then the latch.
- The instructions match what is visible.
- The steps are in the right order.
Select Exit Preview (A) when the procedure is correct.
5. Publish the manual
Select Publish in the editor toolbar (Ctrl+Alt+Shift+P). In the Publish Manual dialog:
- Keep the suggested version. A first publish defaults to
1.0.0. - Add private release notes such as
First Printable Enclosure manual. - Select Publish to make the version live.
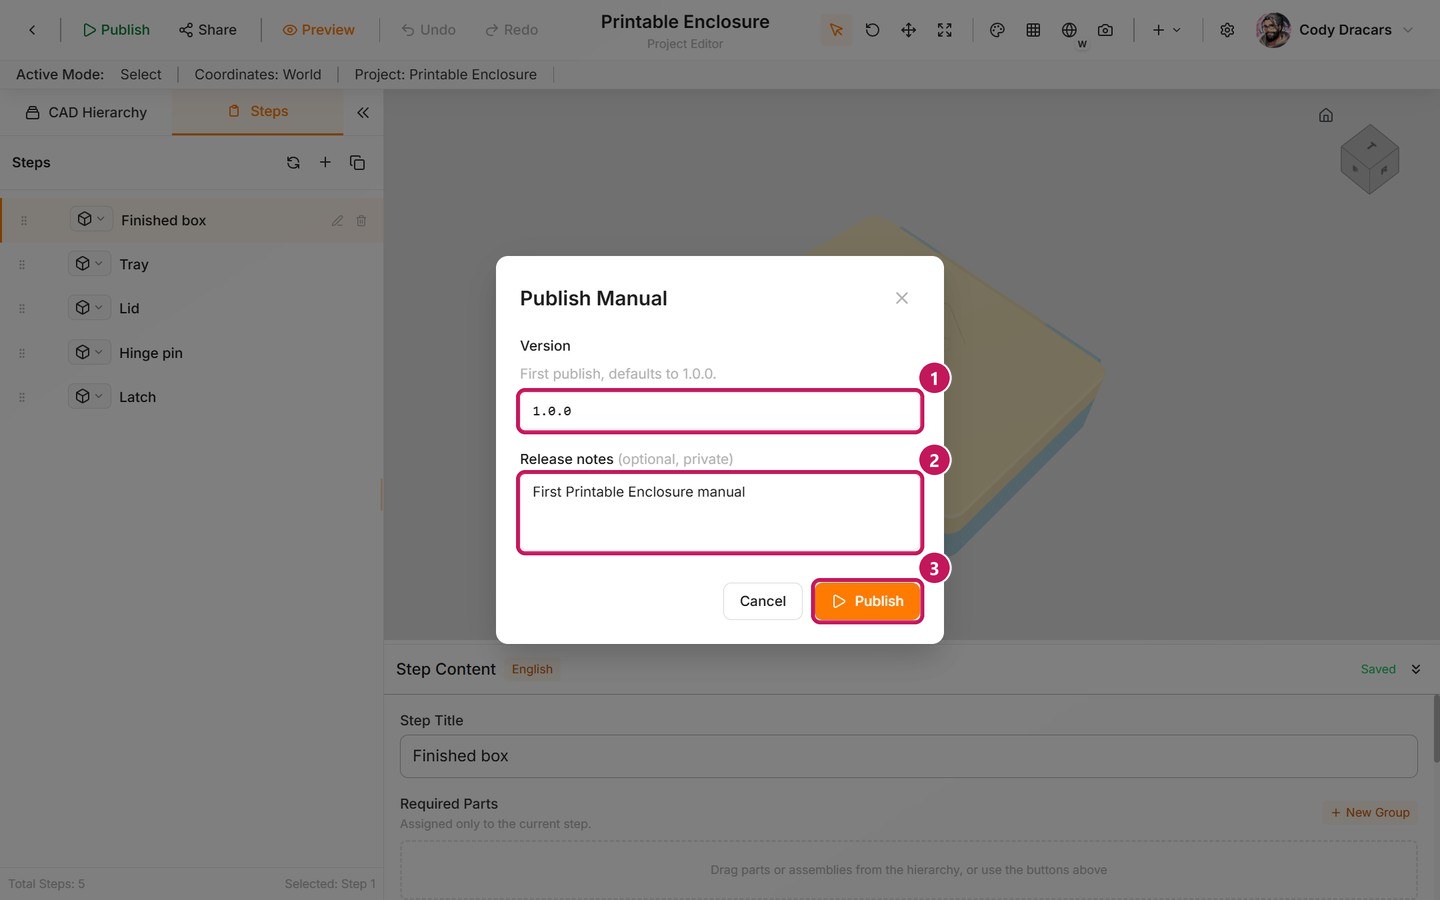
Confirm that the editor reports Project published and shows the live version number. For versions, release notes, and publication controls, see Publish, version, and embed.
6. Share the result
Return to the manual page after publishing. In the Publishing panel:
- Select View live to open the public manual and walk through all five steps one more time.
- Copy the public link (2) when you want to send someone the manual.
- Use Copy embed code when the manual belongs inside another website or portal.
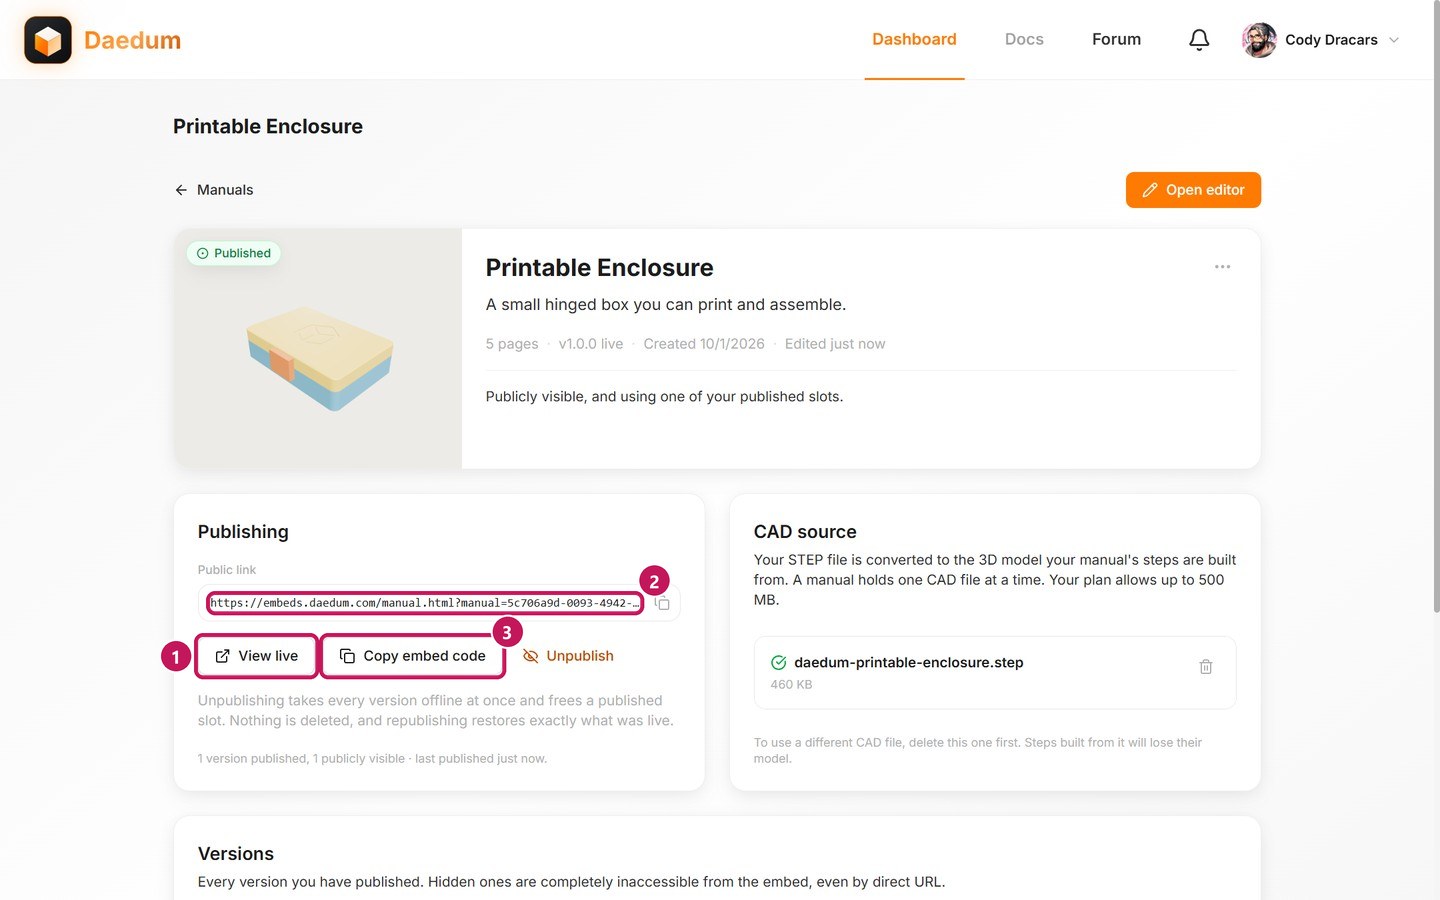
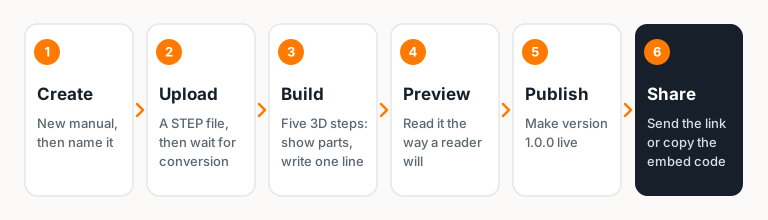
That is the complete first run: create, upload, build, preview, publish, and share.
What this manual does not do yet
The manual works, but it is plain on purpose. Walk through it as an end user and you will notice:
- Every step opens from the same angle, so the hinge pin at the back is hard to see when it appears.
- Nothing shows how a part goes on. The pin and the latch simply appear in place.
- An end user who wants to print the box has no way to get the parts.
The follow-on tutorials fix these one at a time, starting from the manual you just published. Cameras, moving parts, and arrows is next: it gives the pin its own view and shows the pin and latch going on. The guides below cover each feature on its own:
- Create a manual and upload CAD — naming, Projects, CAD preparation, and conversion.
- 3D steps: visibility, cameras, and moving parts — visibility, cameras, moving parts, arrows, and procedure structure.
- Step types: 3D, Image, Text, and Section — 3D Step, Image, and Text items.
- Languages — adding languages and translating step text.
- Publish, version, and embed — versions, public links, and embeds.
- Troubleshooting — conversion, editor, model visibility, and publishing problems.