Printable Enclosure tutorial · Part 5 of 7
Build options with Sections
Use Sections and the option selector to build a manual with two latch styles, where end users pick the one they want to see.
Optional part 5 of 7 in the Printable Enclosure series. Build a second manual where the end user picks which latch they want to build.
Requires a Professional or Commercial plan. This tutorial uses Sections and the option selector, which are not part of the Hobbyist plan. If you are on Hobbyist, skip ahead to Add a second language; nothing later in the series depends on this part. See Plans and limits for what each plan includes.
- Audience: Authors who have finished Part cards and EasyPrint.
- Before you begin: The published Printable Enclosure manual from the earlier parts, open for reference, and the variants file
daedum-printable-enclosure-variants.stepfrom the same download as the first STEP file. - Starting point: A dashboard with one published manual.
- End result: A new manual, Printable Enclosure (two latches), where the end user picks a slide latch or a snap latch and only sees the one they chose. You will publish it as
1.0.0, then as1.1.0with a part card for every part, snap latch included.
Why this is a new manual
The Printable Enclosure you have been working on has one latch: the FrontLatch that slides on sideways. The variants file adds a second one, SnapLatch, which presses onto the front rails and comes off with a small pull tab. To show both, the manual needs a model that has both in it.
A manual holds one CAD file at a time. Swapping in a different file means deleting the current one first, and every step built from it loses its model. So instead of touching your published manual, we will leave it alone and start a fresh one from the variants file. The original keeps working for anyone who only wants the slide latch.
The variants file is the same enclosure as before, with SnapLatch added and lying on the table beside the box. Nothing else in the model is different.
What we are building
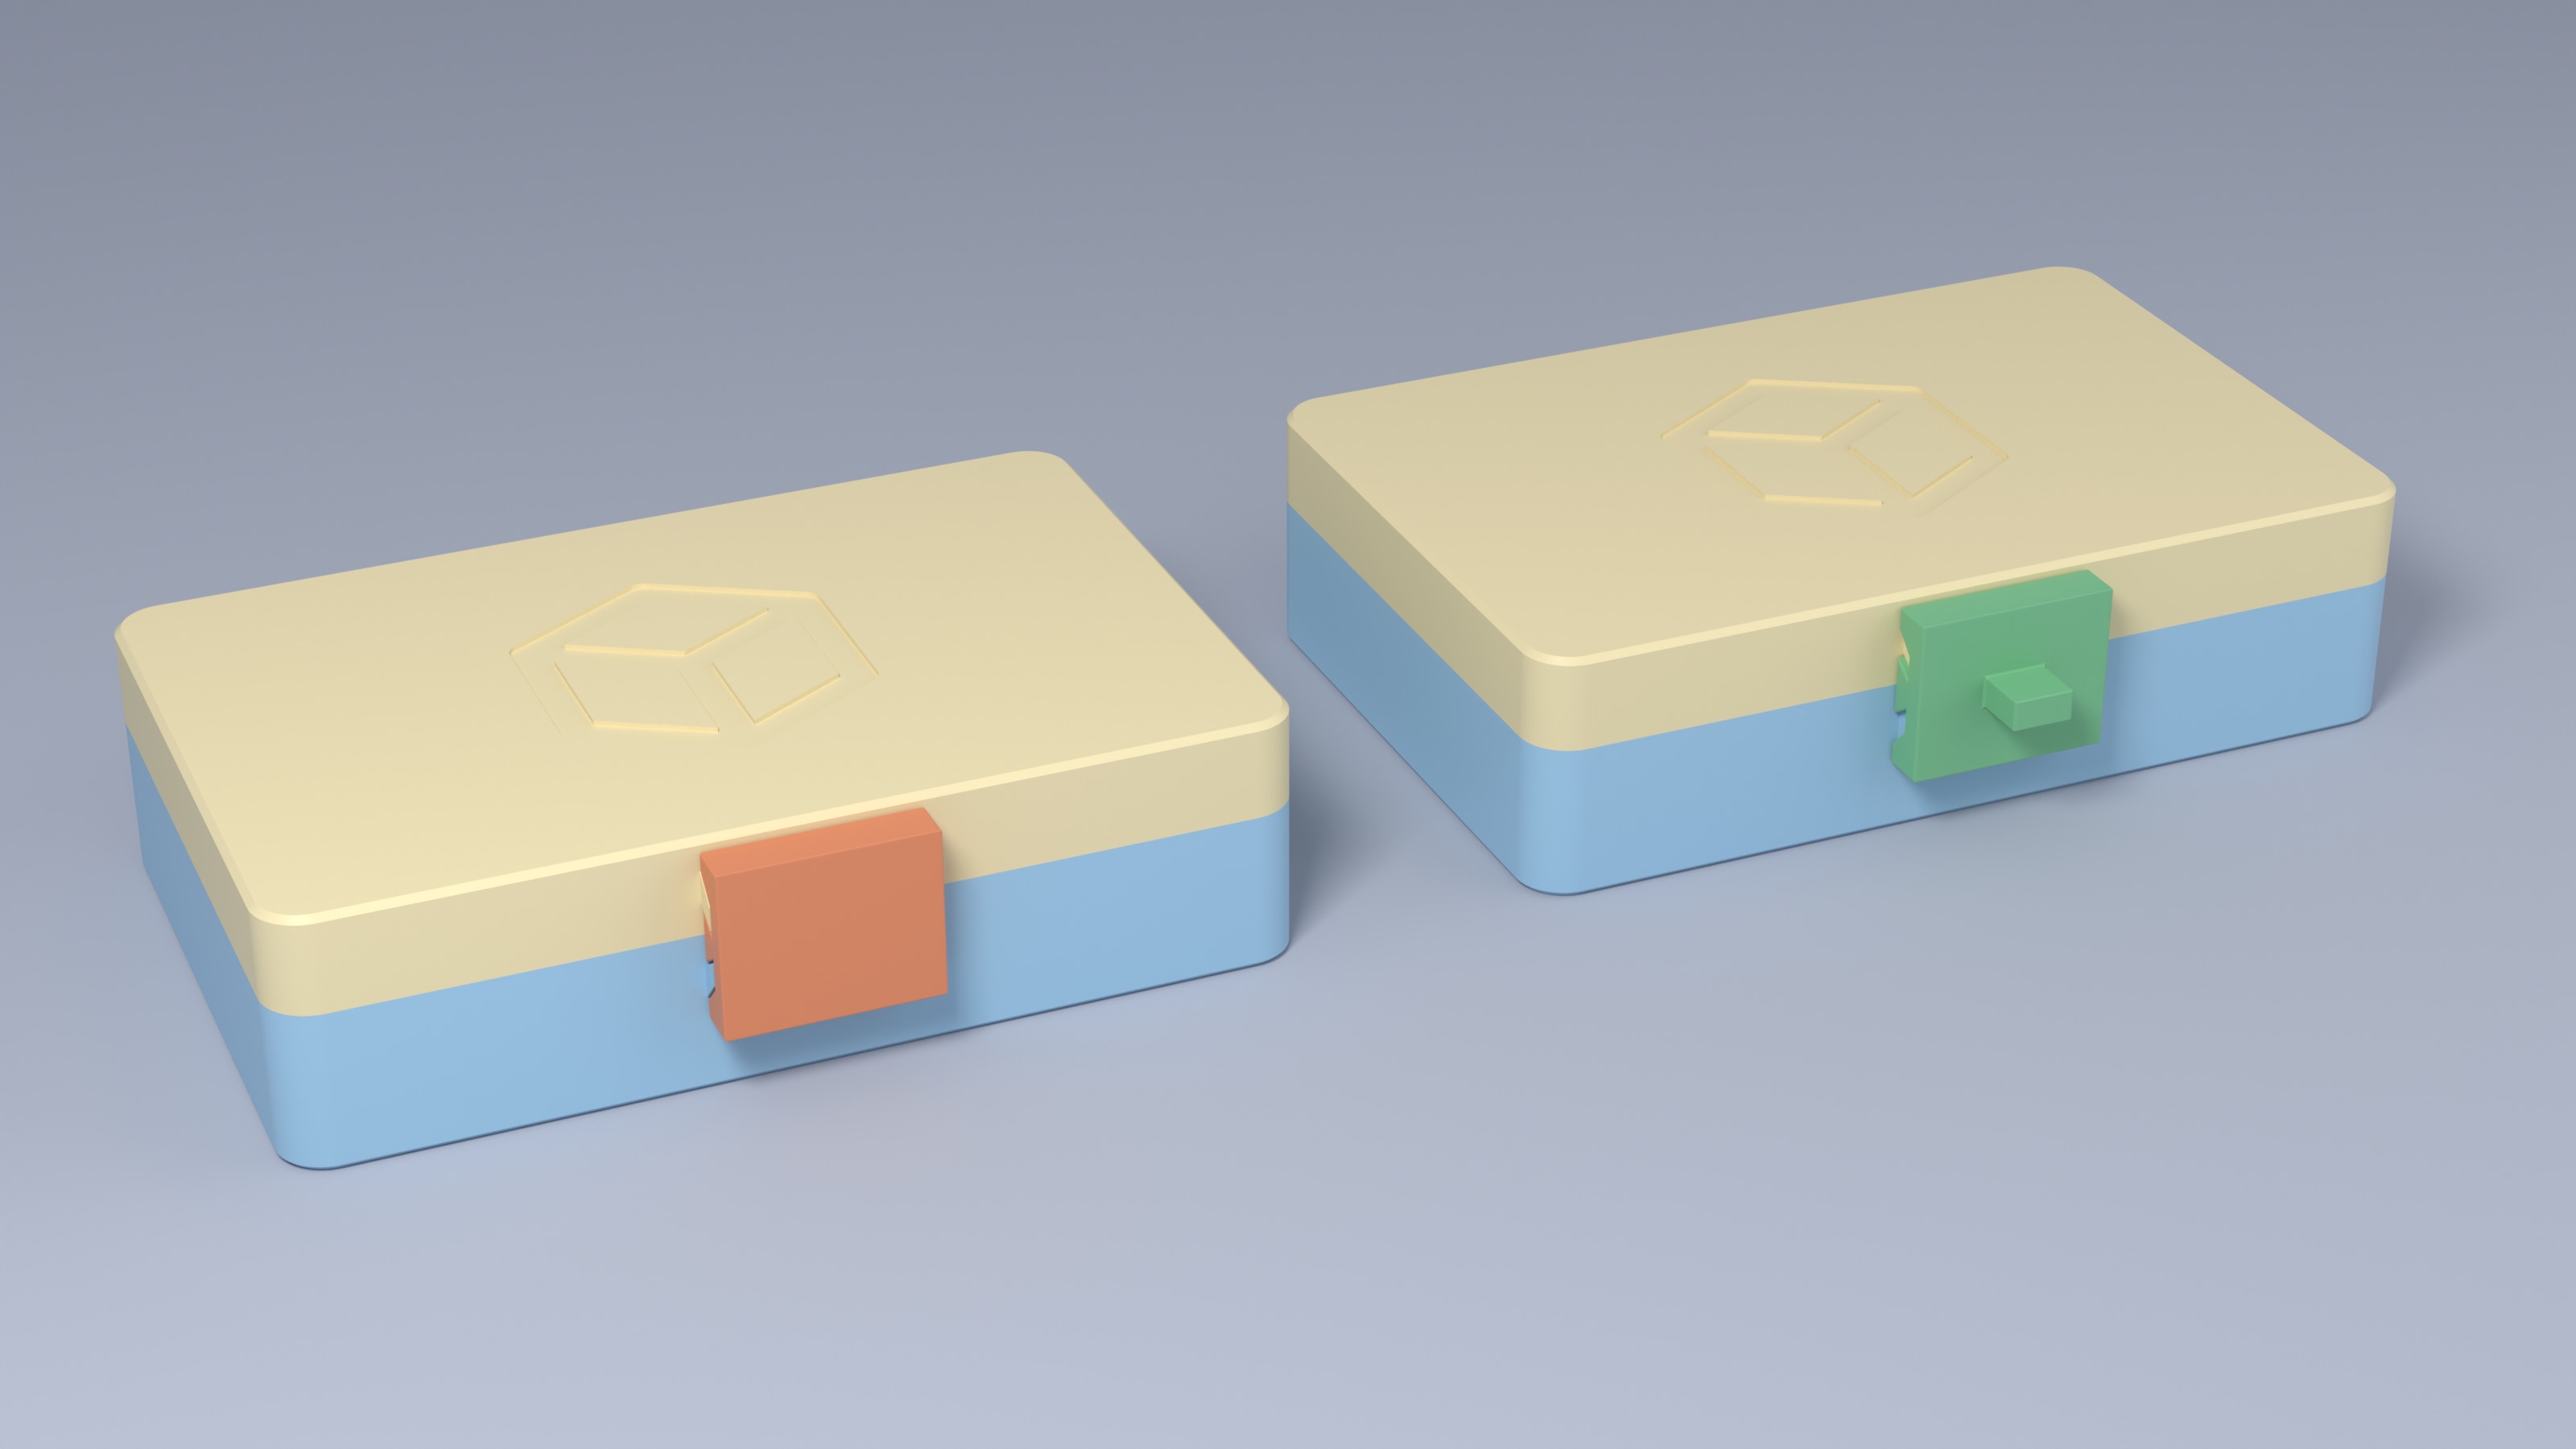
The same box, with each latch fitted. The new manual will cover both.
| # | Section | What it holds | Shown to |
|---|---|---|---|
| 1 | Assemble the box | Three steps: tray, lid, hinge pin | Everyone |
| 2 | Fit the slide latch | One step: the latch slides on sideways | End users who pick Slide |
| 3 | Fit the snap latch | One step: the snap latch presses on, with an arrow | End users who pick Snap |
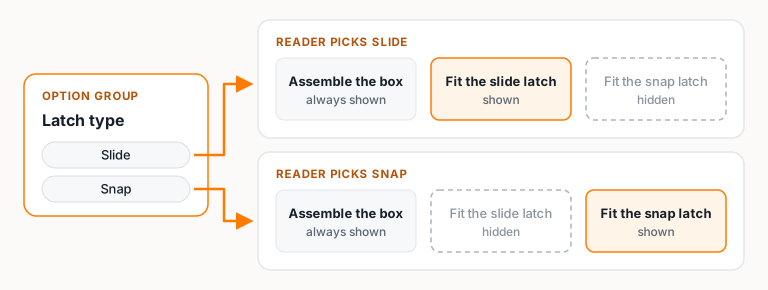
The end user makes their choice once, in an option selector, and Daedum hides whichever section doesn't apply to them.
1. Create the second manual
- From the dashboard, select New manual.
- Set Name to
Printable Enclosure (two latches)and Description toA small hinged box with a choice of slide or snap latch.Manual names have to be unique, so keep the brackets. - Select Create, then upload
daedum-printable-enclosure-variants.step. Wait for CAD converted, then select Open editor.
If you need a refresher on any of these screens, Build and publish your first manual walks through each one.
Open CAD Hierarchy. You should see five parts: BaseTray, Lid, HingePin, FrontLatch, and SnapLatch.
2. Build the shared steps quickly
You have done all of this before in part 1, so here is the short version.
- Select the first step. Hide
Lid,HingePin,FrontLatch, andSnapLatchso onlyBaseTrayis showing. Turn the box so its front (the side with the latch rail) faces you, and tilt it so you are looking down from above. Save that angle with Set Initial Camera (Ctrl+Alt+C) and Save Camera, and title the stepTray. - Duplicate the step, show
Lid, and title itLid. - Duplicate again, show
HingePin, and title itHinge pin.
Keep FrontLatch and SnapLatch hidden in all three. For the instructions, you can reuse the wording from Build and publish your first manual. Duplicating a step keeps its camera, which is why every step opens from the same angle.
The front of the box matters more than usual here, because both latches fit on the front and the end user needs to see them. If the rail ends up on the far side, select each step, press the home button, turn the box around, and save the camera again.
3. Add the slide latch section
- Select the Hinge pin step, then select Add manual item and choose Section. Daedum adds the Section after the step. Because it is the first Section in the manual, it also groups the three steps above it into one called Introduction.
- Select Introduction and rename it
Assemble the box. - Select the new Section. Set Section Name to
Fit the slide latchand Section Blurb toClose the lid and slide the latch on from the side. - Select the Hinge pin step, duplicate it as
Slide latch, and drag the copy into Fit the slide latch. ShowFrontLatchso the step shows the finished box with the slide latch fitted. - In Instructions, enter: “Close the lid, then slide the latch sideways over the rail on the front.”
If you did the arrows in Cameras, moving parts, and arrows, feel free to pull the latch clear and add an arrow here too. It isn't needed for the choice to work, though.
4. Add the snap latch section
The snap latch starts out on the table beside the box, so this step has to bring it around to the front.
- Select the Slide latch step, then Add manual item and Section. Set Section Name to
Fit the snap latchand Section Blurb toClose the lid and press the latch on from the front. - Select the Hinge pin step, duplicate it as
Snap latch, and drag the copy into Fit the snap latch. ShowSnapLatchand keepFrontLatchhidden. - Select
SnapLatchin CAD Hierarchy, then select Move Mode (T). Drag its red arrow (the one pointing along the front) until the latch sits in front of the rails. Two or three short drags usually does it. Then drag the green arrow up a little so the latch sits across the seam, level with where the slide latch would be. If you overshoot, Reset Selected puts it back (it will ask you to confirm). - Add a Straight Arrow: select Add Indicator, then Straight Arrow, and click the latch. It shows up large and pointing down onto the latch. Shrink it with Scale Mode (
S), then switch to Rotate Mode (R) and drag the red ring about a quarter of the way around, until the arrow points into the front rails from the front. Cameras, moving parts, and arrows covers the scale and rotate handles if you need a reminder. - In Instructions, enter: “Close the lid, then press the snap latch onto the rails on the front until it seats. Pull the tab to take it off.”
A quick heads up: the snap latch hasn't been test-printed yet, so we don't know how well its arm flexes. If you publish the model for others to print, say so in your own manual.
5. Offer the choice
Now we tell Daedum which section goes with which choice.
- Select Settings in the editor toolbar, then the Sections and build options tab.
- Turn on Show option selector in embed, and set Selector title to
Choose your latch. - Select Add Group. Daedum creates a group with two choices, Choice A and Choice B. Name the group
Latch type, and rename the choicesSlideandSnap. - Under Section Visibility, tick Fit the slide latch under Slide, and Fit the snap latch under Snap. Leave Assemble the box unticked in both, so every end user sees it.
- Under Before a reader chooses, select Ask before opening. An end user who builds the wrong latch has to reprint it, so it is better to ask than guess. (Open with a default is the better pick when either choice would be fine.)
- Select Save Settings.
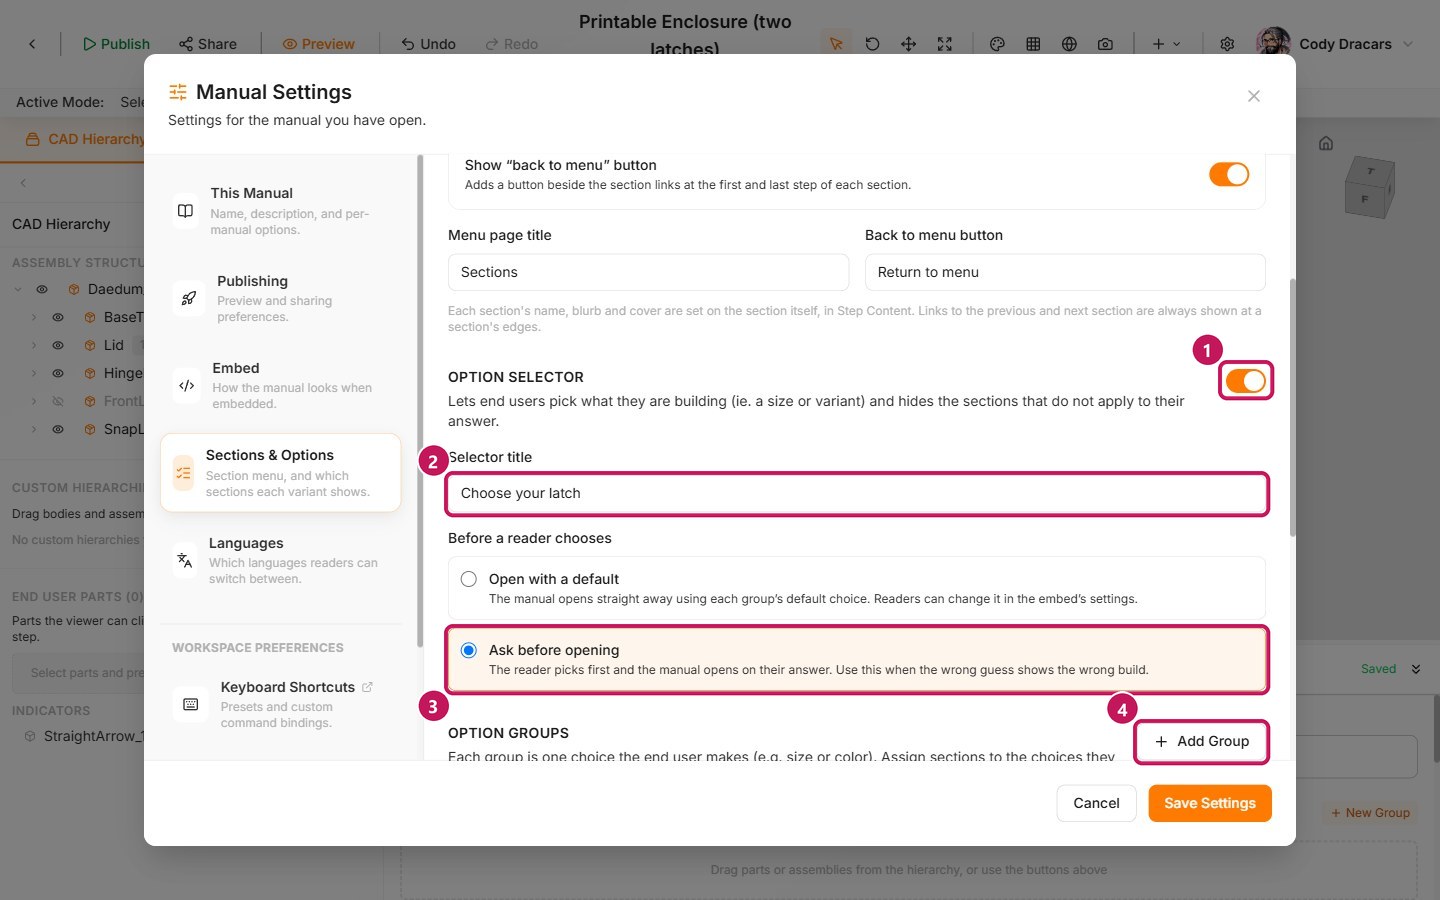
- (1) The on/off switch for the option selector.
- (2) The Selector title.
- (3) Ask before opening.
- (4) Add Group.
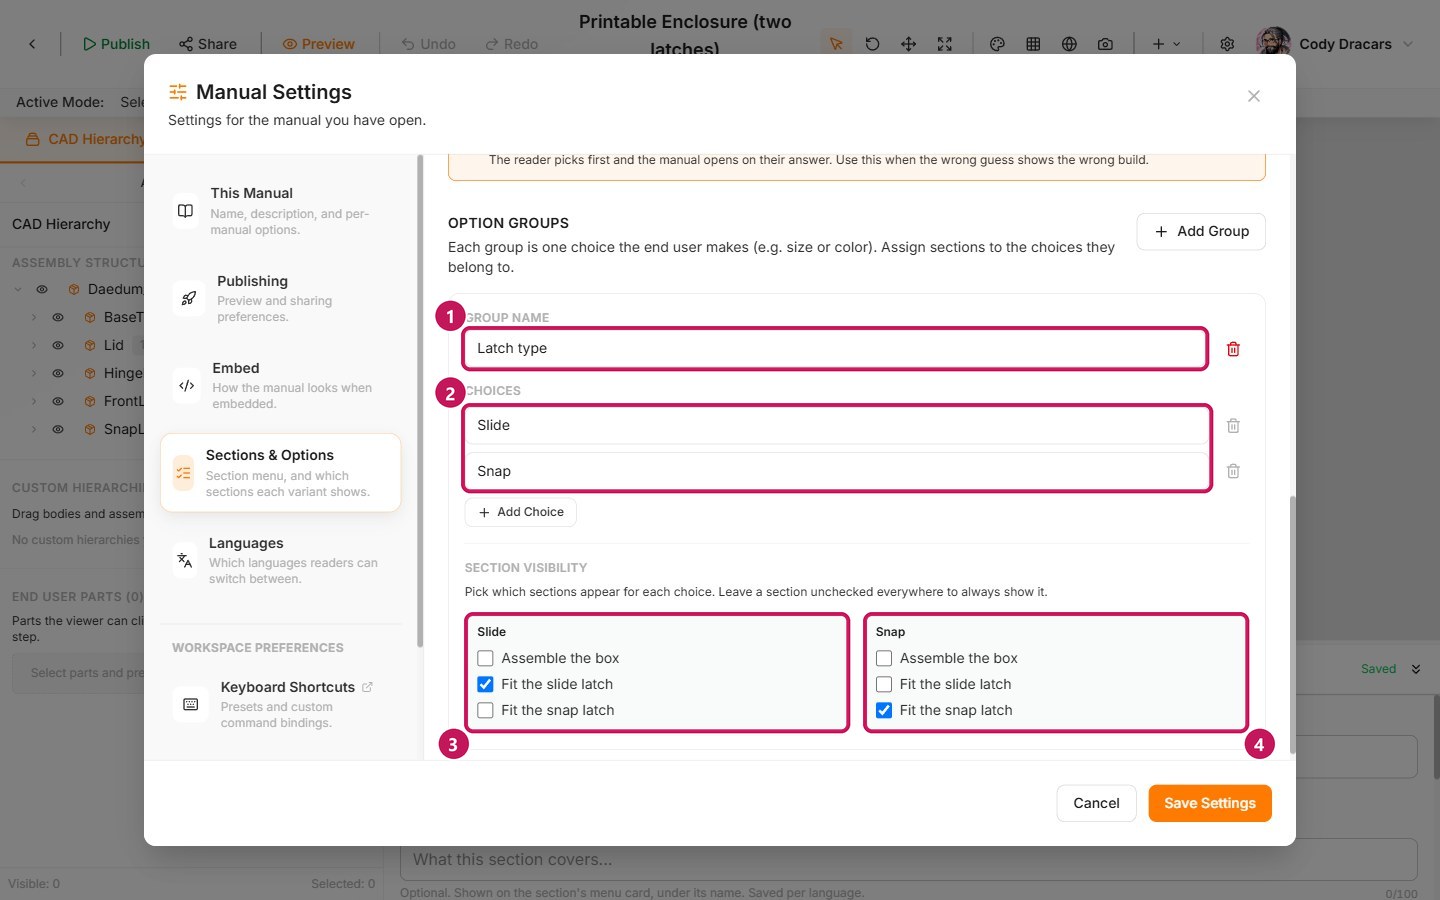
- (1) The group name, which the end user sees.
- (2) The two choices, which the end user also sees.
- (3) The sections shown for Slide: only the slide latch section.
- (4) The sections shown for Snap: only the snap latch section.
6. Check the section menu
In the same tab, Show section menu page and Show "back to menu" button are already on. Since the selector is set to ask first, an end user picks their latch and then lands on a menu of section cards, showing only the cards that apply to them. Leave both on. Sections and build options covers the menu settings and the back-to-menu button in more detail.
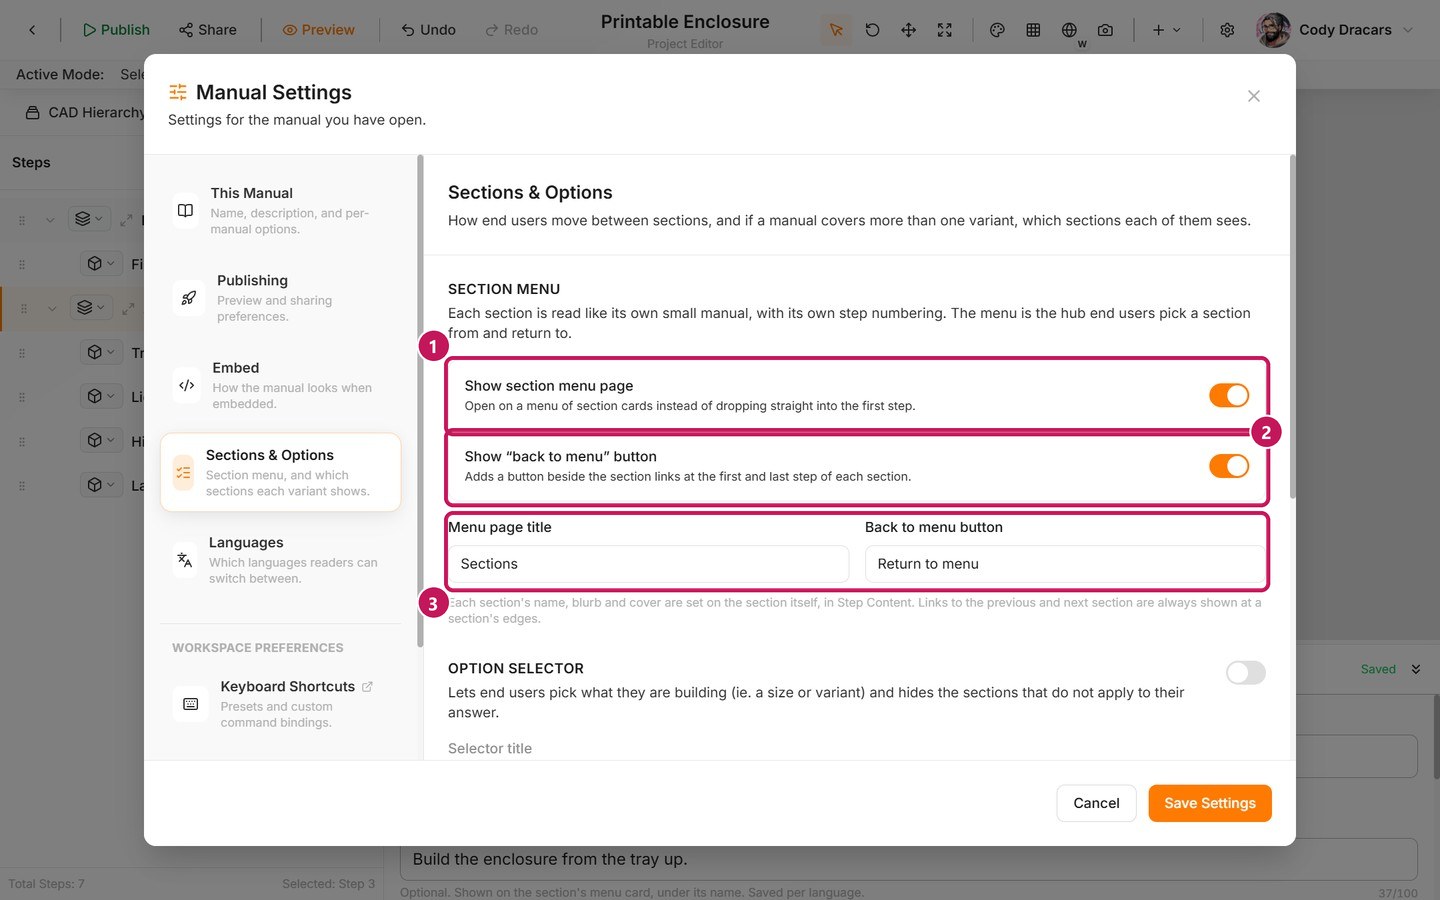
- (1) Show section menu page.
- (2) Show "back to menu" button.
- (3) The menu page title and button label.
7. Preview each choice
Select Preview (Ctrl+Alt+P). Before it shows anything, the end-user view asks for a choice.
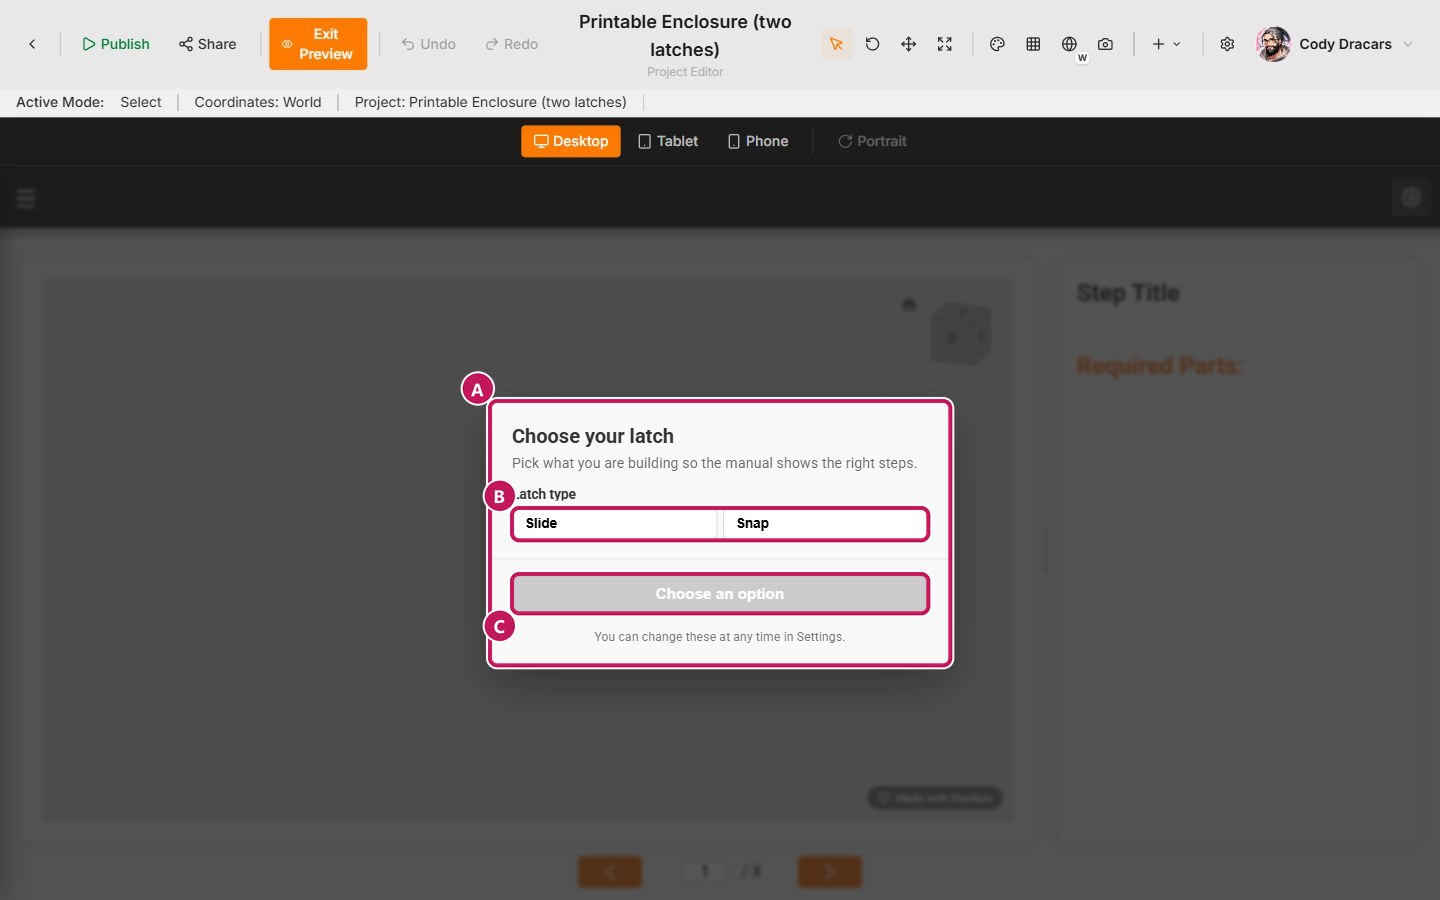
- (A) The Choose your latch box.
- (B) The Slide and Snap buttons.
- (C) Choose an option.
Pick Slide (B), then Choose an option (C). The end-user view opens on a Sections menu with two cards: Assemble the box, and Fit the slide latch with one page. Don't worry if your page count doesn't match the screenshot: Assemble the box has three pages for now, and four once you add the picture in step 11.
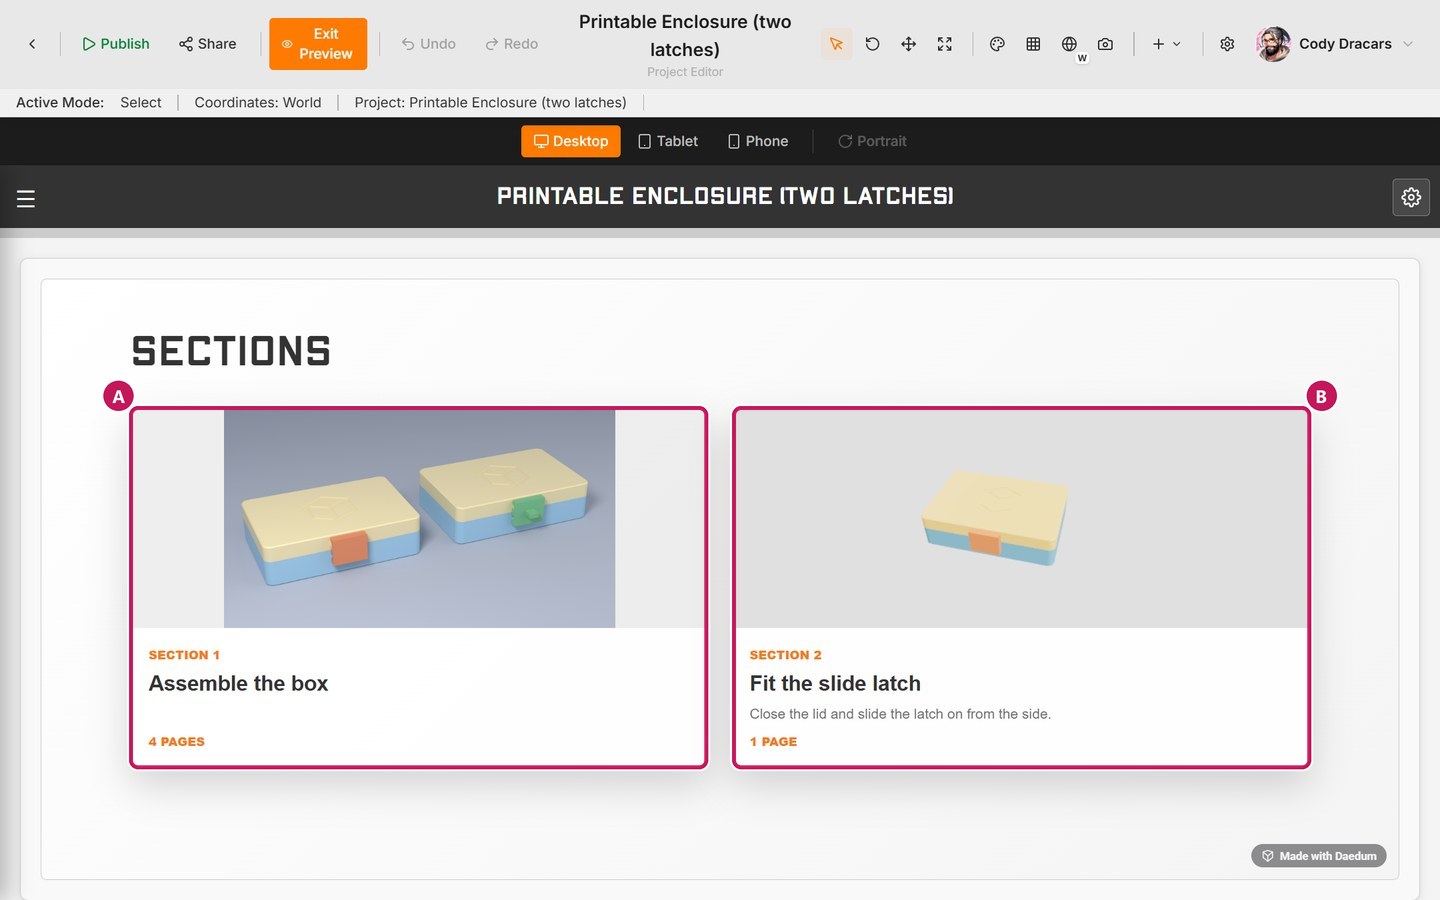
- (A) Assemble the box.
- (B) Fit the slide latch.
The snap latch section is hidden. Open Fit the slide latch to see the slide latch fitted.
To try the other choice, select the gear at the top right of the end-user view. Its Settings now include your Latch type choice, so an end user can always change their mind. Pick Snap, and the view switches to the snap latch step right away.
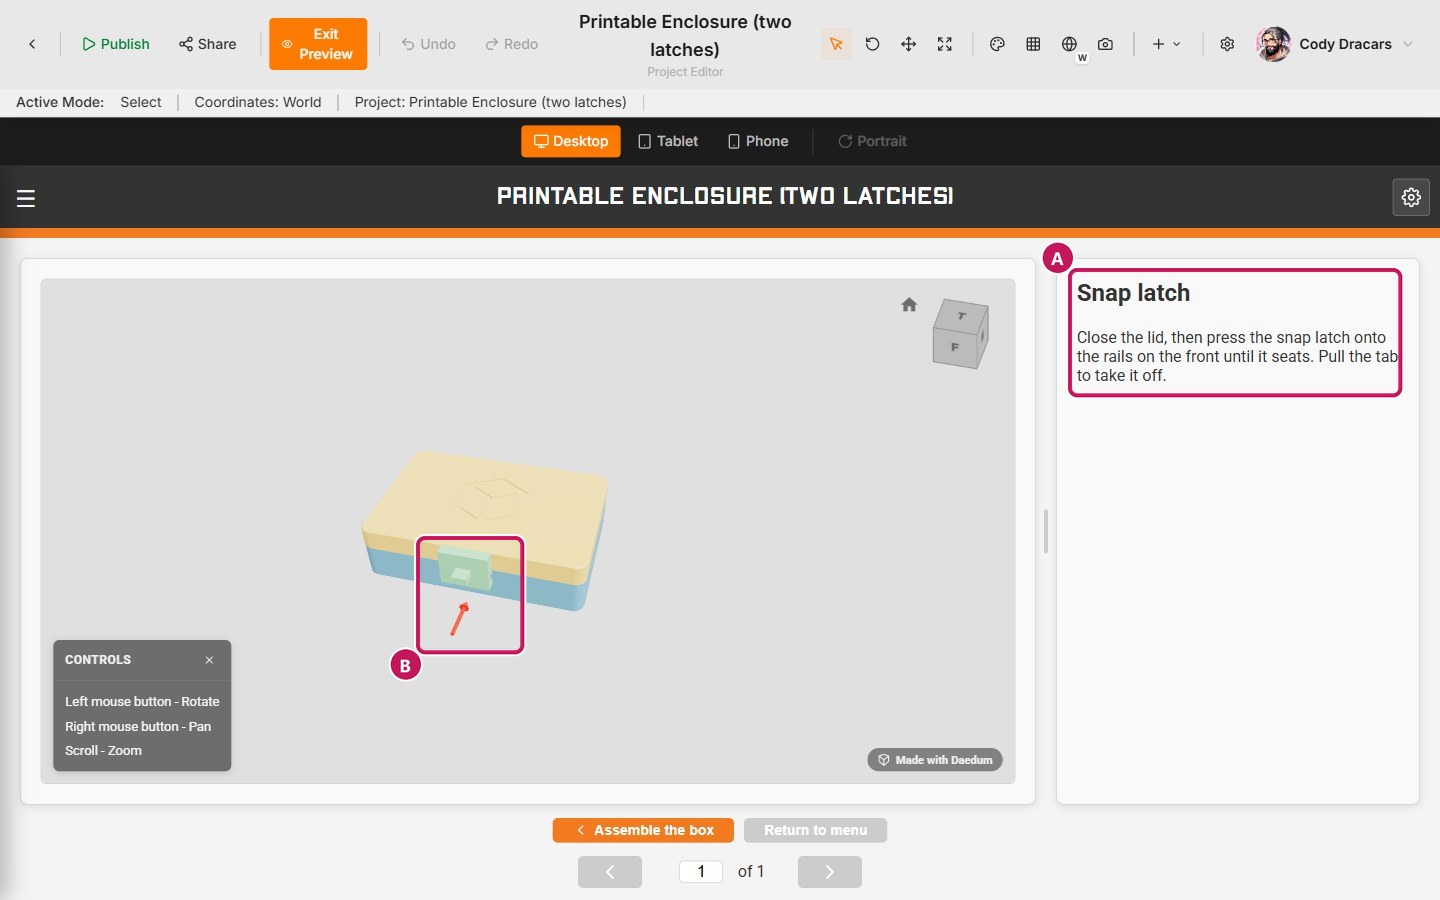
- (A) The instruction.
- (B) The snap latch, with its arrow.
Check that:
- The selector shows up first, titled
Choose your latch. - Picking Slide shows Assemble the box and Fit the slide latch, and never the snap latch.
- Picking Snap shows Assemble the box and Fit the snap latch, with the snap latch at the front and its arrow.
- The shared steps look the same under both choices.
An end user's choice is remembered in their browser, so they won't be asked again on their next visit. To see the prompt again yourself, open the link in a private window.
Select Exit Preview once both choices read clearly.
8. Publish the new manual
- Select Publish in the editor toolbar (
Ctrl+Alt+Shift+P). - A new manual starts at
1.0.0. Keep it, and add private release notes such asSlide or snap latch. - Select Publish.
Anyone opening the new manual's address for the first time gets the Choose your latch prompt before anything else. Share that address, or copy its embed from Share. Your first manual hasn't changed, so the two now live side by side.
9. Add part cards
So far the manual shows both latches, but gives the end user no way to actually get them. Let's add the part cards from Part cards and EasyPrint so they can print the snap latch too.
- In CAD Hierarchy, select each of the five parts in turn and select Define, until End User Parts reads (5).
- Open each part's card and give it a name and a description. Use the same names as part 4 for the tray, lid, pin, and slide latch, and call the new one
Snap latch: “A clip that presses onto the two rail halves and is pulled off by a small tab. It is the snap alternative to the front latch.” - In each card, turn on EasyPrint and set Supports to No. Set the print orientation for the tray, lid, pin, and slide latch the same way you did in part 4. Leave the snap latch's orientation alone for now. It hasn't been test-printed, so there is no orientation to recommend yet.
- On each assembly step, drag that part's card into Required Parts: Base tray on Tray, Lid on Lid, Hinge pin on Hinge pin, Front latch on Slide latch, and Snap latch on Snap latch.
- Select Settings, then the Embed tab, turn on Part Cards Panel, and select Save Settings.
10. Publish the cards
Select Publish, choose minor (which makes 1.1.0), add the notes Add part cards, and select Publish.
Now an end user who opens the manual and picks a latch can open Part Cards from the navigation menu and see all five cards.
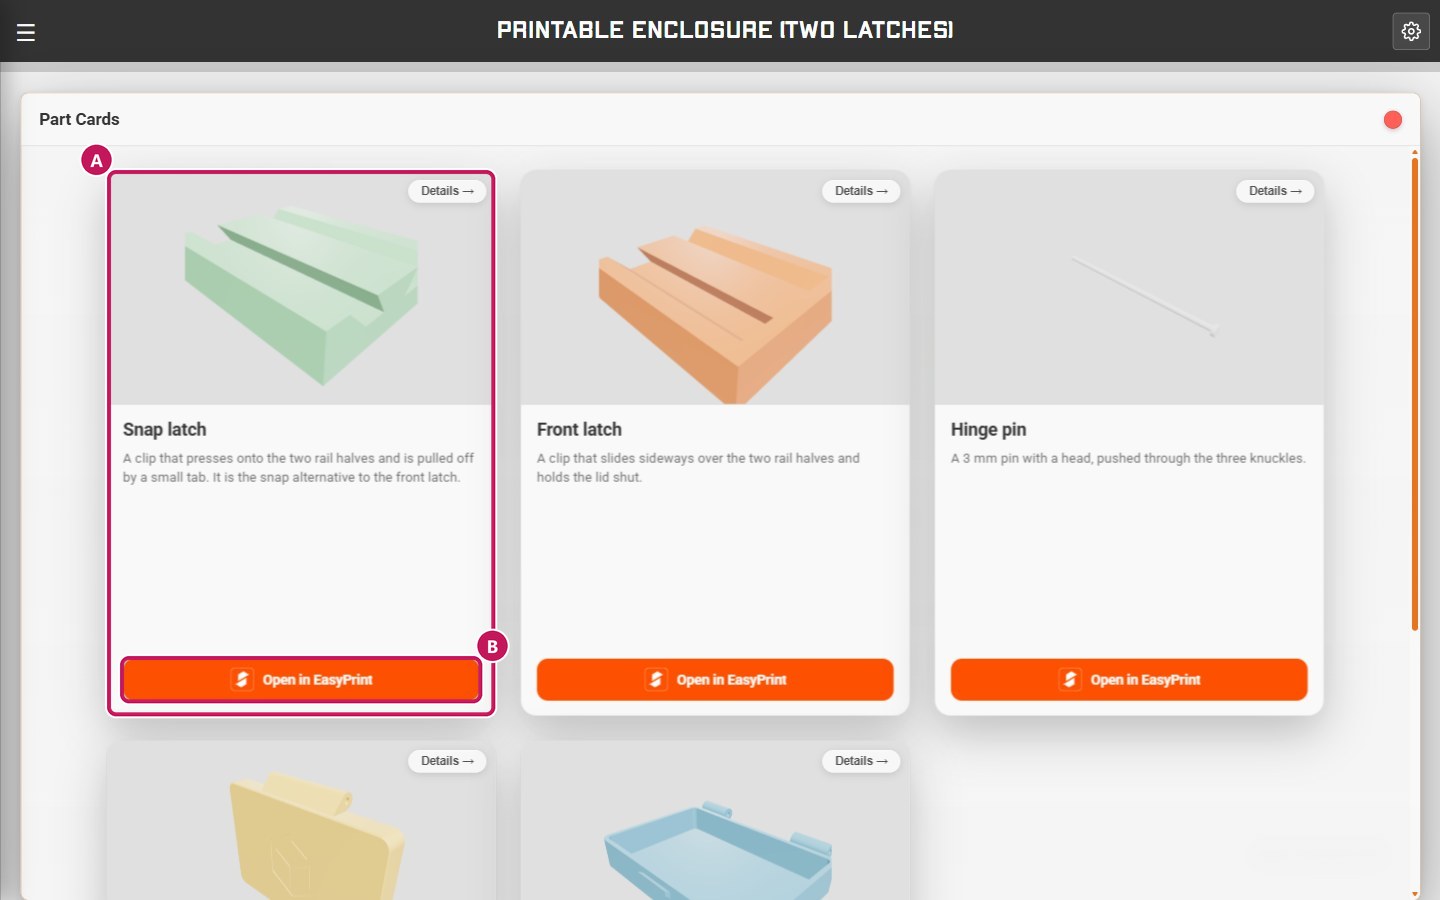
- (A) A card for every part, snap latch included.
- (B) The Open in EasyPrint button on each card.
Remember, the snap latch hasn't been test-printed, so mention that in your own manual if you publish the model for others to print.
11. Open with a picture of both latches
An end user picking a latch hasn't actually seen what the two options look like yet. Let's fix that by adding the picture from the top of this page as the first page of Assemble the box. You will find render-two-latches.jpg in the same Printable Enclosure download.
- In the Steps panel, select the Assemble the box section, then select Add manual item and choose Image. The new item lands at the top of the section, before Tray.
- Set Page Title to
Two latches. - Under Media, choose or drop
render-two-latches.jpg. - Select Publish, choose minor (which makes
1.2.0), add the notesAdd the two-latch render, and select Publish.
Assemble the box now has four pages, and the end user sees both latches before the first step.
What this manual does not do yet
The manual now covers two latches and lets an end user print every part. What is still missing:
- An end user can only read the manual in English.
- The snap latch has no recommended print orientation, because it hasn't been test-printed.
Add a second language is next: it goes back to the original manual and adds Spanish. These guides cover the features on their own:
- Sections and build options — the section menu, option groups, and label translations.
- Parts, part cards, and EasyPrint — part cards and EasyPrint in full.
- Languages — adding languages and translating step text.
- Publish, version, and embed — versions, public links, and embeds.